
In this blog post, we will show you how to install Joomla on Debian 13 with Apache as a web server and a Free Let’s Encrypt SSL certificate. Joomla is a free content management system (CMS) that helps people build and manage websites without needing advanced coding skills. It is used for business websites, blogs, online stores, school websites, and community portals. Joomla offers ready-made templates, extensions, and user management, making it easy to add new features. It is flexible, secure, and supports many languages. People choose Joomla because it is customizable, easy to update, and suitable for both small websites and large, complex projects.
Installing Joomla on Debian 13 with Apache as a web server is a straightforward process that may take up to 15 minutes. Let’s get things done!
Prerequisites
- A server running Debian 13 OS
- A valid domain pointed to the server IP address
- User privileges: root or a non-root user with sudo privileges
Step 1. Update the System
Before we start installing any software, we will update the system packages to their latest versions. To do that, execute the following command:
apt update -y && apt upgrade -y
Step 2. Install Apache Web Server
To install the Apache Web server, execute the following command:
apt install apache2 -y
Once installed, start and enable the Apache service:
systemctl start apache2 && systemctl enable apache2
Check the status of the service:
systemctl status apache2
You should get the following output:
root@host:~# systemctl status apache2
● apache2.service - The Apache HTTP Server
     Loaded: loaded (/usr/lib/systemd/system/apache2.service; enabled; preset: enabled)
     Active: active (running) since Tue 2026-07-07 09:13:52 CDT; 8min ago
 Invocation: 3a378aa6ba084ddea22641d0ca5ab973
       Docs: https://httpd.apache.org/docs/2.4/
   Main PID: 1806 (apache2)
      Tasks: 55 (limit: 4655)
     Memory: 5.3M (peak: 5.8M)
        CPU: 120ms
     CGroup: /system.slice/apache2.service
             ├─1806 /usr/sbin/apache2 -k start
             ├─1808 /usr/sbin/apache2 -k start
Step 3. Install MariaDB database service
To install the MariaDB database service, execute the following command:
apt install mariadb-server -y
Once installed, start and enable the MariaDB service:
systemctl start mariadb && systemctl enable mariadb
Check the status of the service:
systemctl status mariadb
You should get the following output:
root@host:~# systemctl status mariadb
● mariadb.service - MariaDB 11.8.6 database server
     Loaded: loaded (/usr/lib/systemd/system/mariadb.service; enabled; preset: enabled)
     Active: active (running) since Tue 2026-07-07 09:24:27 CDT; 14s ago
 Invocation: 6fa6e91fd4bd4add89d949a5c35dce34
       Docs: man:mariadbd(8)
             https://mariadb.com/kb/en/library/systemd/
   Main PID: 2886 (mariadbd)
     Status: "Taking your SQL requests now..."
      Tasks: 14 (limit: 30725)
     Memory: 124.6M (peak: 129.1M)
        CPU: 3.661s
     CGroup: /system.slice/mariadb.service
             └─2886 /usr/sbin/mariadbd
Step 4. Install PHP with extensions
To install PHP with the extensions, execute the following command:
apt install php8.4 libapache2-mod-php8.4 php8.4-fpm php8.4-mysql php8.4-xml php8.4-mbstring php8.4-curl php8.4-intl php8.4-gd php8.4-zip -y
Once installed, verify the installation with the following command:
php -v
You should get the following output:
root@host:~# php -v
PHP 8.4.23 (cli) (built: Jul  3 2026 12:26:56) (NTS)
Copyright (c) The PHP Group
Built by Debian
Zend Engine v4.4.23, Copyright (c) Zend Technologies
    with Zend OPcache v8.4.23, Copyright (c), by Zend Technologies
Step 5. Create Joomla database and user
To create a Joomla database, Joomla user, and assign the correct permissions, execute the following commands:
CREATE USER 'joomlauser'@'localhost' IDENTIFIED BY 'YourStrongPassword';

CREATE DATABASE joomladb;

GRANT ALL PRIVILEGES ON joomladb.* TO 'joomlauser'@'localhost';

FLUSH PRIVILEGES;

EXIT;
Step 6. Download and install Joomla
First, we need to download and extract the Joomla files:
mkdir -p /var/www/html/joomla

cd /var/www/html/joomla

wget https://downloads.joomla.org/cms/joomla6/6-0-3/Joomla_6-0-3-Stable-Full_Package.zip?format=zip -O /var/www/html/joomla/joomla.zip

unzip joomla.zip

rm joomla.zip
Set the right permissions to files and folders.
chown -R www-data:www-data /var/www/html/joomla

find . -type d -exec chmod 755 {} \;

find . -type f -exec chmod 644 {} \;
Step 7. Create Apache Virtual Host File
To create an Apache configuration file, execute the following command:
touch /etc/apache2/sites-available/joomla.conf
Open the file
nano /etc/apache2/sites-available/joomla.conf
Paste the following lines of code:
<VirtualHost *:80>
ServerName yourdomain.com
DocumentRoot /var/www/html/joomla

<Directory /var/www/html/joomla>
AllowOverride All
</Directory>

ErrorLog ${APACHE_LOG_DIR}/error.log
CustomLog ${APACHE_LOG_DIR}/access.log combined

</VirtualHost>
Save the file and close it.
Enable the Apache configuration files for Joomla along with the rewrite module.
a2enmod rewrite

a2ensite joomla.conf
Check the Apache2 syntax:
apachectl -t
You should receive the following output:
root@host:/var/www/html/joomla# apachectl -t
Syntax OK
If the syntax is OK, restart the Apache service.
systemctl restart apache2
Step 8. Install Free Let’s Encrypt SSL certificate
Before we install Let’s Encrypt, we need to install the Certbot plugin for Apache:
apt install python3-certbot-apache -y
Once installed, we can obtain a certificate with the command below:
certbot --apache -d yourdomain.com -d www.yourdomain.com
Through the process, you will be asked a couple of questions about personal data:
root@host:/var/www/html# sudo certbot --apache -d yourdomain.com
Saving debug log to /var/log/letsencrypt/letsencrypt.log
Enter email address or hit Enter to skip.
 (Enter 'c' to cancel): [email protected]

- - - - - - - - - - - - - - - - - - - - - - - - - - - - - - - - - - - - - - - -
Please read the Terms of Service at:
https://letsencrypt.org/documents/LE-SA-v1.5-February-24-2025.pdf
You must agree in order to register with the ACME server. Do you agree?
- - - - - - - - - - - - - - - - - - - - - - - - - - - - - - - - - - - - - - - -
(Y)es/(N)o: Y

- - - - - - - - - - - - - - - - - - - - - - - - - - - - - - - - - - - - - - - -
Would you be willing, once your first certificate is successfully issued, to
share your email address with the Electronic Frontier Foundation, a founding
partner of the Let's Encrypt project and the non-profit organization that
develops Certbot? We'd like to send you email about our work encrypting the web,
EFF news, campaigns, and ways to support digital freedom.
- - - - - - - - - - - - - - - - - - - - - - - - - - - - - - - - - - - - - - - -
(Y)es/(N)o: N
Account registered.
Requesting a certificate for yourdomain.com

Successfully received certificate.
Certificate is saved at: /etc/letsencrypt/live/yourdomain.com/fullchain.pem
Key is saved at:         /etc/letsencrypt/live/yourdomain.com/privkey.pem
This certificate expires on 2026-10-05.
These files will be updated when the certificate renews.
Certbot has set up a scheduled task to automatically renew this certificate in the background.

Deploying certificate
Successfully deployed certificate for yourdomain.com to /etc/apache2/sites-available/website-le-ssl.conf
Congratulations! You have successfully enabled HTTPS on https://yourdomain.com

- - - - - - - - - - - - - - - - - - - - - - - - - - - - - - - - - - - - - - - -
If you like Certbot, please consider supporting our work by:
 * Donating to ISRG / Let's Encrypt:   https://letsencrypt.org/donate
 * Donating to EFF:                    https://eff.org/donate-le
- - - - - - - - - - - - - - - - - - - - - - - - - - - - - - - - - - - - - - - -
That’s it! Now you can access your website securely at https://yourdomain.com
Step 9. Finish Joomla Installation
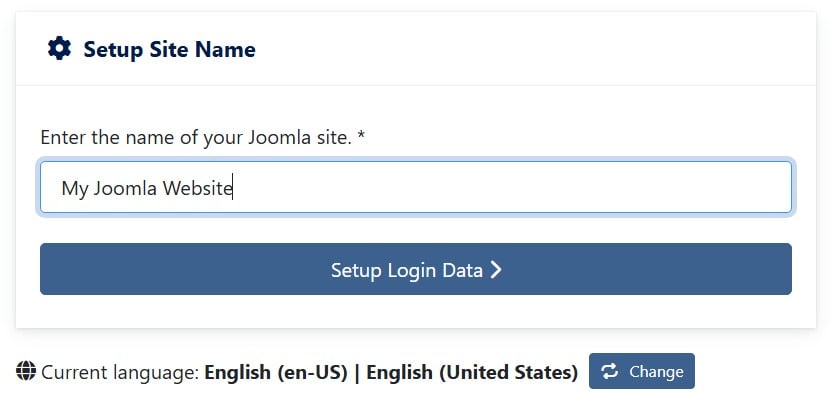
To finish the Joomla installation, access your domain securely at https://yourdomain.com. On the first screen, enter your Joomla website name:
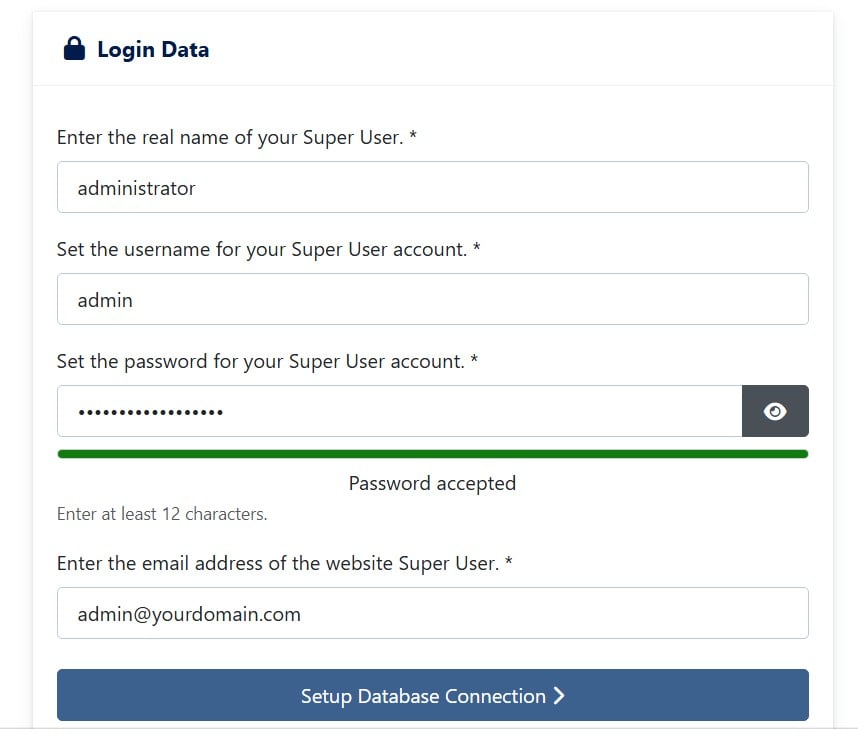
After clicking on Setup Login Data, you need to enter your super user account login info:
The next screen is for the database connection. Enter the database credentials you created in Step 3 above:
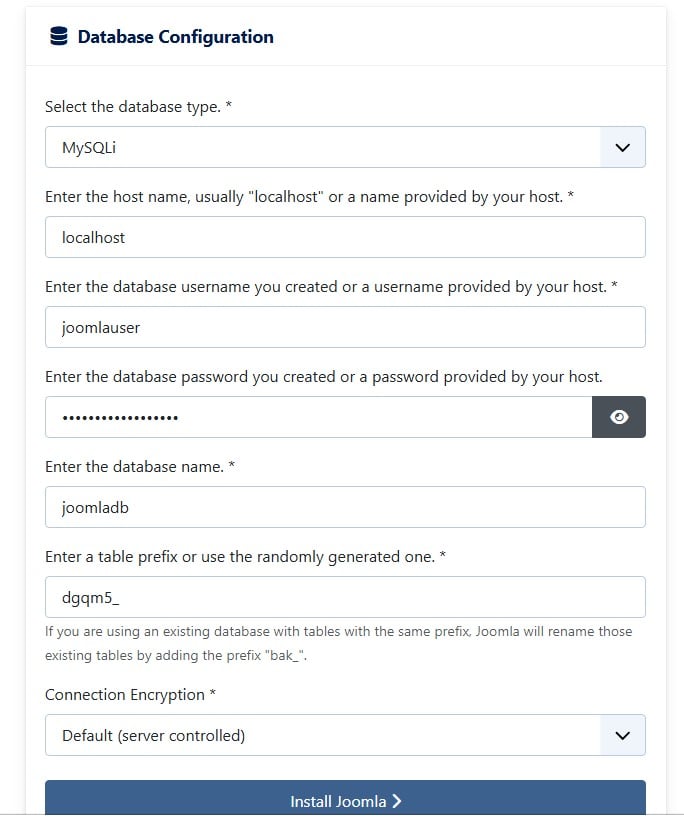
Once the credentials are entered, click on the Install Joomla button, and allow some time for the installation process to complete:
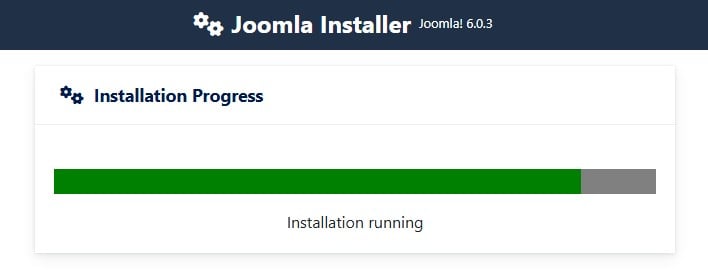
Once done, you will be redirected to the following screen:
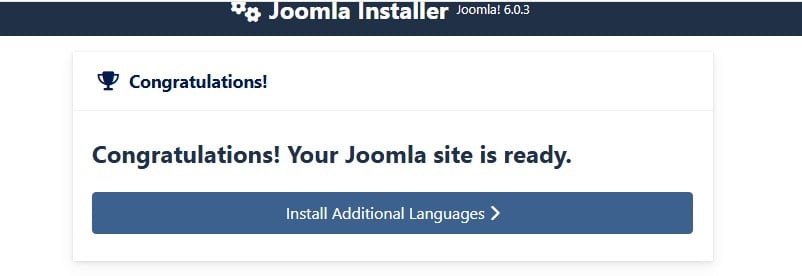
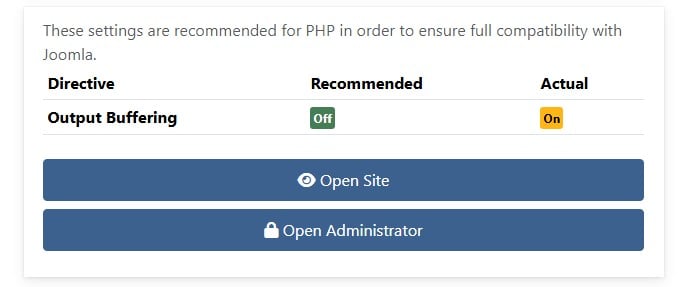
Scroll down to choose whether you want to visit the website or admin dashboard:
Bringing It All Together
Congratulations! You successfully installed Joomla with Apache and Let’s Encrypt on Debian 13 OS.
If you have difficulties with this installation, our Linux admins will help you with any aspect. You need to sign up for one of our monthly server management or per-incident server support plans. Do not hesitate to contact us anytime. We are available 24/7.
If you liked this post about how to install Joomla on Debian 13 with Apache and Let’s Encrypt, please share it with your friends or leave a comment below.
