

In this blog post, we will show you how to set up Nginx Proxy Manager as a Reverse Proxy with Automatic SSL on a Linux server. Nginx Proxy Manager is a practical solution for managing reverse proxies without dealing with complex command-line configuration. Its intuitive web interface makes it easy to route traffic to multiple applications while keeping everything organized. One of its most useful features is automatic SSL certificate management through Let’s Encrypt, which removes the hassle of manually creating, renewing, and installing certificates. With just a few clicks, websites and self-hosted services can be secured using HTTPS, improving both security and user trust. This makes Nginx Proxy Manager especially popular among home lab enthusiasts, developers, and small businesses that host several services. Overall, it offers a reliable, beginner-friendly way to simplify reverse proxy management while ensuring encrypted, secure connections with minimal maintenance.
To set up Nginx Proxy Manager (NPM) as a reverse proxy with automatic SSL on Linux, we need to deploy it using Docker Compose. In this blog post, we will use Ubuntu 26.04 OS. Let’s get started!
Prerequisites
- A server running Linux OS
- User privileges: root or non-root user with sudo privileges
- A valid domain with a pointed A record to the server IP address
Step 1. Update the System
Before installing anything on the server, it’s important to keep the system packages up to date. Run the following command to upgrade everything to the newest versions:
apt update -y && apt upgrade -y
Step 2. Install Docker
Docker is important for Nginx Proxy Manager because Nginx Proxy Manager is typically deployed as a Docker container, providing an isolated, portable environment that simplifies installation, deployment, updates, and ongoing management across different systems.
Before installing Docker, install the required dependencies by running the following command:
apt install software-properties-common apt-transport-https ca-certificates -y
After that, import the official Docker GPG key to verify package authenticity:
curl -fsSL https://download.docker.com/linux/ubuntu/gpg | gpg --dearmor -o /usr/share/keyrings/docker-archive-keyring.gpg
The next step is to add the official Docker repository to your system:
echo "deb [arch=amd64 signed-by=/usr/share/keyrings/docker-archive-keyring.gpg] https://download.docker.com/linux/ubuntu $(lsb_release -cs) stable" | sudo tee /etc/apt/sources.list.d/docker.list > /dev/null
With the repository in place, refresh the package index and install Docker along with its required components:
apt update -y

apt install docker-ce docker-ce-cli containerd.io docker-buildx-plugin docker-compose-plugin -y
After the installation finishes, start the Docker service and configure it to launch automatically during system startup:
systemctl start docker && systemctl enable docker
You can verify that the Docker service is running correctly by checking its current status:
systemctl status docker
If everything was installed successfully, you should see output similar to the following:
root@host:~# systemctl status docker
● docker.service - Docker Application Container Engine
     Loaded: loaded (/usr/lib/systemd/system/docker.service; enabled; preset: enabled)
     Active: active (running) since Sat 2026-07-18 19:23:36 CDT; 3s ago
 Invocation: bc1af8973df44915be54547ffd6c12ef
TriggeredBy: ● docker.socket
       Docs: https://docs.docker.com
   Main PID: 6029 (dockerd)
      Tasks: 44
     Memory: 33.9M (peak: 36.3M)
        CPU: 2.323s
     CGroup: /system.slice/docker.service
             ├─6029 /usr/bin/dockerd -H fd:// --containerd=/run/containerd/containerd.sock
Step 3. Create Docker Compose File
First, create a dedicated directory for Nginx Proxy Manager to store its configuration and database files:
mkdir -p /opt/nginx-proxy-manager

cd /opt/nginx-proxy-manager
Then create a Docker Compose file:
nano docker-compose.yml
And paste the following lines of code:
services:
  app:
    image: 'jc21/nginx-proxy-manager:latest'
    restart: unless-stopped
    ports:
      - '80:80'
      - '81:81'
      - '443:443'
    volumes:
      - ./data:/data
      - ./letsencrypt:/etc/letsencrypt
Save the file, close it, and start the Nginx Proxy Manager Container:
docker compose up -d
The image pulling process of the images will start, and after the installation is completed, the output should look like this:
root@host:/opt/nginx-proxy-manager# docker compose up -d
[+] up 34/34
 ✔ Image jc21/nginx-proxy-manager:latest Pulled
 ✔ Container nginx-proxy-manager-app-1   Started
To check the running container, execute the command below:
docker ps --format "table {{.ID}}\t{{.Names}}\t{{.Status}}\t{{.Ports}}"
You will see complete information about the running container:
CONTAINER ID   NAMES                       STATUS         PORTS
22380e4bbfb9   nginx-proxy-manager-app-1   Up 4 minutes   0.0.0.0:80-81->80-81/tcp, [::]:80-81->80-81/tcp, 0.0.0.0:443->443/tcp, [::]:443->443/tcp
The web interface of the Nginx Proxy Manager is accessible via the server’s IP address on port 81.
Step 4. Access Nginx Proxy Manager Admin UI
To access the Nginx Proxy Manager Admin UI, visit the following URL: http://YourServerIPAddress:81
On the first screen, create the admin account by entering the Full Name, Email Address, and Strong Password.
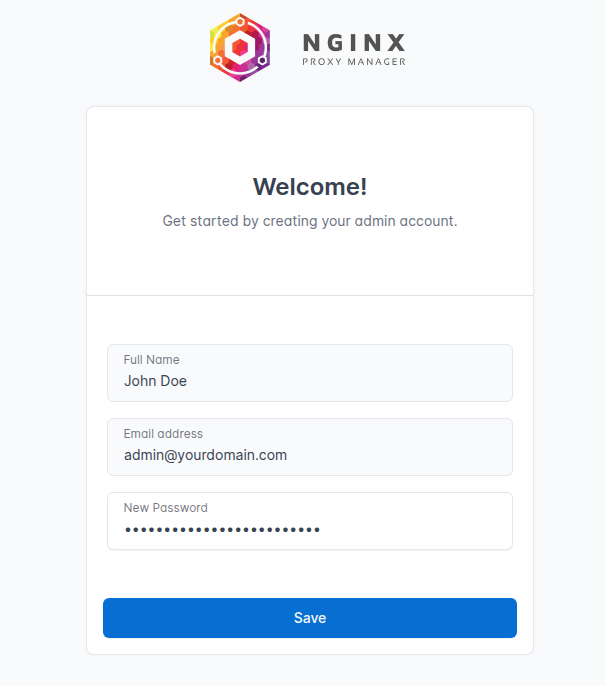
After entering the credentials, click on the Save button, and you will be redirected to the Nginx Proxy Manager Admin GUI.

Step 5. Configure a Reverse Proxy with Automatic SSL
To configure a reverse proxy with automatic SSL, navigate to Hosts > Proxy Hosts and click Add Proxy Host.
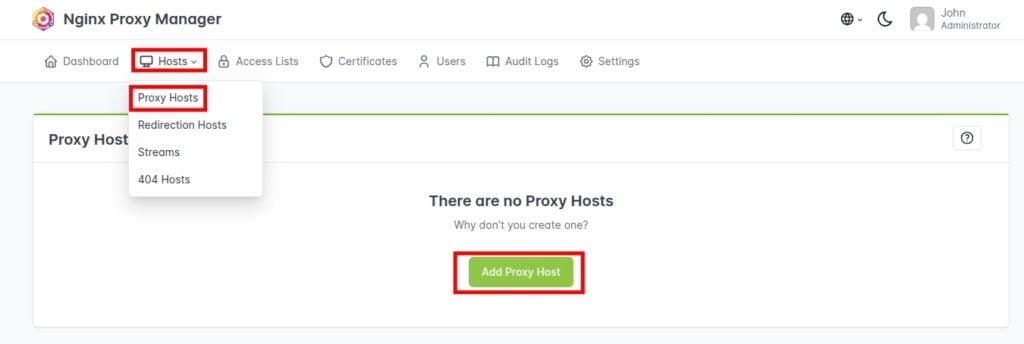
Fill in the domain name. In the Scheme, choose HTTPS; for hostname/IP, enter your server’s IP address; and for Forward Port, use port 81. This way, we will make the Nginx Proxy Manager Admin UI accessible via a domain name with automatic SSL.
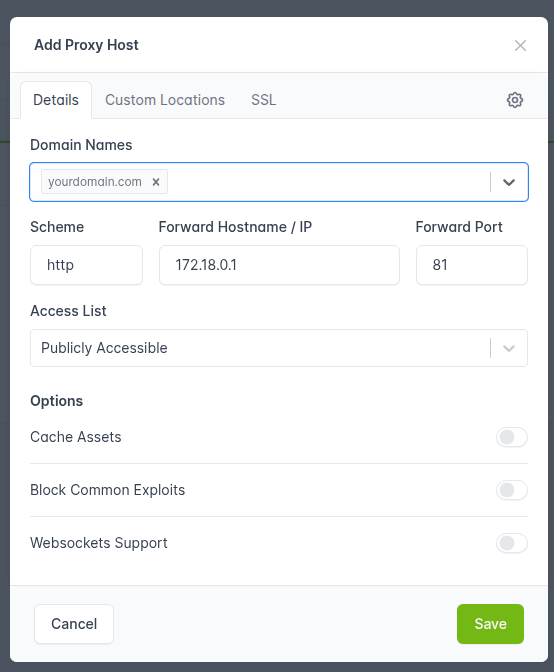
After saving these changes, you will be redirected to the hosts list:

To request an SSL certificate, click on the three dots on the right and then on Edit:
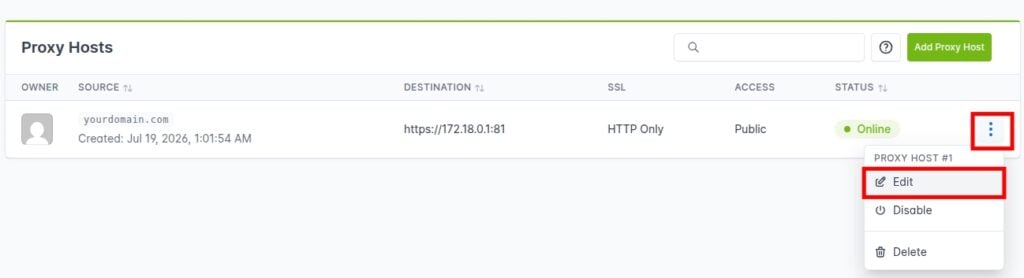
In the SSL tab, under SSL Certificate, select Request a new SSL Certificate from the dropdown menu. Then toggle on Force SSL to automatically upgrade all HTTP traffic to HTTPS and click Save.
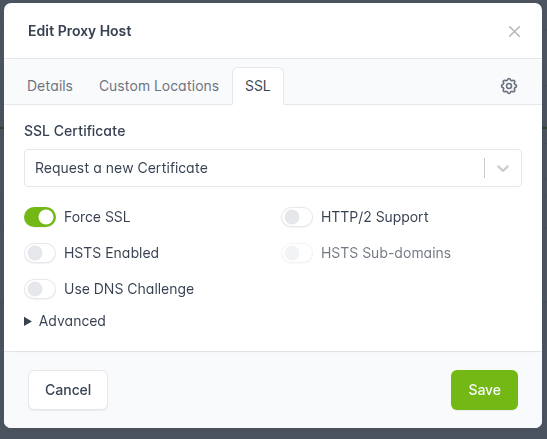
The SSL will be installed in the background, and you will be redirected to the Hosts list, where the HTTP-only option under the SSL section will change to Let’s Encrypt.

Now you can access the Nginx Proxy Manager Admin UI securely at https://YourDomain.com
You’ve Set Up Nginx Proxy Manager as a Reverse Proxy
That’s it. You successfully configured Nginx Proxy Manager as a Reverse Proxy with Automatic SSL on a Linux server.
If you have difficulties with this installation, our Linux admins will help you with any aspect of it. You need to sign up for one of our monthly server management or per-incident server support plans. Do not hesitate to contact us anytime. We are available 24/7.
If you liked this post about Nginx Proxy Manager as a Reverse Proxy with Automatic SSL, please share it with your friendsor leave a comment below.
