

In this tutorial, we are going to explain in step-by-step detail how to install Apache Spark on AlmaLinux 9 OS.
Apache Spark is an open-source unified analytics engine used for data processing large amounts of data. This software stores data in memory and performs the operations very fast using SQL query languages. Apache Spark is written in Scala language and is compatible with multiple operating systems such as macOS, Windows, and Linux of course.
Installing Apache Spark and running it as a service is a straightforward process and may take up to 10 minutes. Let’s get things done.
Prerequisites
- Fresh installation of AlmaLinux 9 as OS
- User privileges: root or non-root user with sudo privileges
Step 1. Update the System
Before we install Apache Spark we need to update the system packages to the latest version available.
sudo dnf update -y && sudo dnf upgrade -y
Step 2. Install Java
The application programming interface is written in Java so we need to install Java with the following command:
sudo dnf install java-11-openjdk -y
After the installation you can check the installed Java version with the following command:
java -version
You should get the following output:
[root@vps ~]# java -version
openjdk version "11.0.18" 2023-01-17 LTS
OpenJDK Runtime Environment (Red_Hat-11.0.18.0.10-2.el9_1) (build 11.0.18+10-LTS)
OpenJDK 64-Bit Server VM (Red_Hat-11.0.18.0.10-2.el9_1) (build 11.0.18+10-LTS, mixed mode, sharing)
Step 3. Install Apache Spark
We can not install Apache Spark with the command since it is not included in the default repository of AlmaLinux 9. We need to download it manually and extract it in a directory on the server. To do that execute the following commands:
cd /home

curl -O https://www.apache.org/dyn/closer.lua/spark/spark-3.3.2/spark-3.3.2-bin-hadoop3.tgz

gunzip -c spark-3.2.3-bin-hadoop3.2.tgz | tar xvf -

rm spark-3.2.3-bin-hadoop3.2.tgz

mv spark-3.2.3-bin-hadoop3.2/ spark/
Step 4. Create System User
We need to create a system user for Apache Spark. To do that execute the following command:
useradd useradd sparkuser
Once, created you need to set the right permissions of the Apache Spark document root:
chown -R sparkuser:sparkuser /home/spark
Step 5. Create Service files
Now, we need to create two separate services for Apache Spark. Those services are master and slave services required for Apache Spark to work efficiently. We will start with the master service:
Create the master service file first:
touch /etc/systemd/system/spark-master.service
Open the file with your favorite editor and paste the following lines of codes:
[Unit]
Description=Apache Spark Master
After=network.target

[Service]
Type=forking
User=sparkuser
Group=sparkuser
ExecStart=/home/spark/sbin/start-master.sh
ExecStop=/home/spark/sbin/stop-master.sh

[Install]
WantedBy=multi-user.target
Now, create the slave service file.
touch /etc/systemd/system/spark-slave.service
Open the file with your favorite editor and paste the following lines of codes:
[Unit]
Description=Apache Spark Slave
After=network.target

[Service]
Type=forking
User=sparkuser
Group=sparkuser
ExecStart=/home/spark/sbin/start-slave.sh spark://127.0.0.1:7077
ExecStop=/home/spark/sbin/stop-slave.sh

[Install]
WantedBy=multi-user.target
Once, the files are created reload the daemon and start the services:
sudo systemctl daemon-reload

sudo systemctl start spark-master

sudo systemctl start spark-slave
To check the status of the master service execute the following command:
sudo systemctl status spark-master
You should receive the following output:
[root@host spark]# sudo systemctl status spark-master
● spark-master.service - Apache Spark Master
     Loaded: loaded (/etc/systemd/system/spark-master.service; disabled; vendor preset: disabled)
     Active: active (running) since Sat 2023-02-25 05:45:47 CST; 48s ago
    Process: 1274 ExecStart=/home/spark/sbin/start-master.sh (code=exited, status=0/SUCCESS)
   Main PID: 1286 (java)
      Tasks: 34 (limit: 24796)
     Memory: 242.9M
        CPU: 11.958s
     CGroup: /system.slice/spark-master.service
             └─1286 /usr/lib/jvm/java-11-openjdk-11.0.18.0.10-2.el9_1.x86_64/bin/java -cp "/home/spark/conf/:/home/spark/jars/*" -Xmx1g org.apache.spark.deploy.master.
To check the status of the slave service execute the following command:
sudo systemctl status spark-slave
You should receive the following output:
[root@host spark]# sudo systemctl status spark-slave
● spark-slave.service - Apache Spark Slave
     Loaded: loaded (/etc/systemd/system/spark-slave.service; disabled; vendor preset: disabled)
     Active: active (running) since Sat 2023-02-25 05:45:54 CST; 2min 31s ago
    Process: 1350 ExecStart=/home/spark/sbin/start-slave.sh spark://127.0.0.1:7077 (code=exited, status=0/SUCCESS)
   Main PID: 1363 (java)
      Tasks: 33 (limit: 24796)
     Memory: 178.2M
        CPU: 11.086s
     CGroup: /system.slice/spark-slave.service
             └─1363 /usr/lib/jvm/java-11-openjdk-11.0.18.0.10-2.el9_1.x86_64/bin/java -cp "/home/spark/conf/:/home/spark/jars/*" -Xmx1g org.apache.spark.deploy.worker.
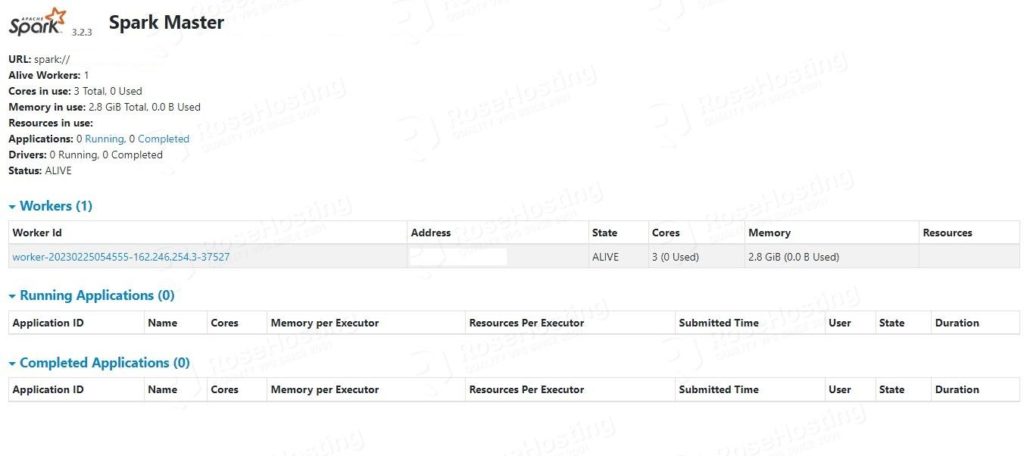
That’s it. Now you can access the Apache Spark service on the following URL: http://YourServerIPAddress:8080.
Congratulations! You successfully installed and configured the Apache Spark service on AlmaLinux 9. If you find any difficulties installing this software and service, you can contact our support. All you need to do is to sign up for one of our NVMe VPS plans and submit a support ticket. We are available 24/7.
