
Uptime Kuma is an open-source monitoring solution. We can monitor our websites and servers’ uptime and configure them to send us notifications via multiple options, like Telegram, email, Discord, etc. Uptime Kuma is an easy-to-use monitoring tool, and it is powerful for traffic control, observability, service discovery, etc. This article will show you how to install Uptime Kuma on Ubuntu 22.04.
Prerequisites
- An Ubuntu server 22.04
- SSH access with root privileges
Step 1. Log in to the server
First, log in to your Ubuntu 22.04 VPS through SSH as the root user:
ssh root@IP_Address -p Port_number
You would need to replace ‘IP_Address‘ and ‘Port_number‘ with your server’s IP address and SSH port number.
Before starting, we need to make sure that all Ubuntu 22.04 packages installed on the server are up to date. You can do this by executing the following commands:
# apt update -y
Step 2. Create a System User
In this step, we will create a new system user and grant it sudo privileges. Let’s say the new system user is called ‘master’; you can choose any username you like.
# adduser master
Next, let’s run the command below to add the new user to sudo group. In Ubuntu operating system, users who are members of sudo group are allowed to run sudo commands.
# usermod -aG sudo master
Once created and given sudo privileges, we can log in as the new user ‘master’, and we will use this user to run commands and complete the Uptime Kuma installation.
# su - master
Step 3. Install NodeJS and NPM
Uptime Kuma requires NodeJS runtime environment and npm. We can install NodeJS from the Ubuntu default repository, but we will get an older version of NodeJS if we use this method and Uptime Kuma requires at least NodeJS version 14. In this step, we will install NodeJS and npm through the NodeJS repository to get the most recent version of it.
$ curl -sL https://deb.nodesource.com/setup_lts.x | sudo -E bash -
Once completed, we need to download the package information from the newly added source above.
$ sudo apt update
Next, run the following command to install NodeJS and NPM finally.
$ sudo apt install nodejs
That’s it; nodejs and NPM are installed; you can check the installed version by executing this one-liner:
$ node -v; npm -v
You will see an output like this:
master@ubuntu22:~$ node -v; npm -v
v16.18.0
8.19.2
Step 4. Install Uptime Kuma
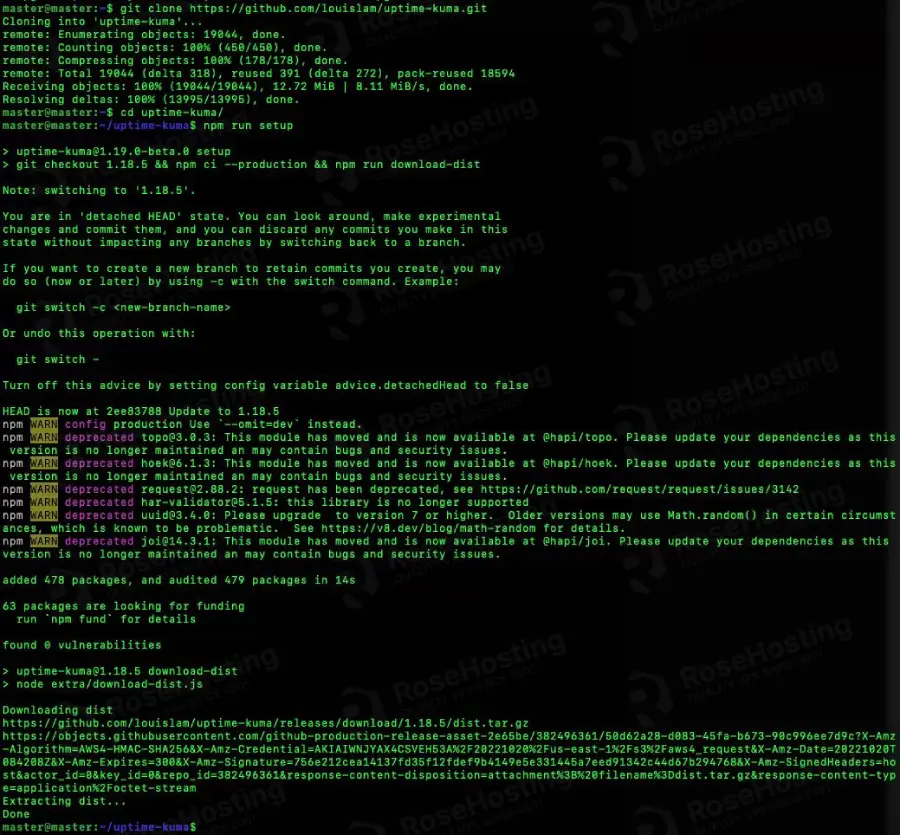
Uptime Kuma is not available in the default Ubuntu repository. We can install it by downloading it from GitHub using git.
$ sudo apt install git
After git is installed, we can continue to clone Uptime Kuma from its GitHub repository.
$ git clone https://github.com/louislam/uptime-kuma.git
$ cd uptime-kuma
It’s time to run the installation using the NPM package manager of Nodejs.
$ npm run setup
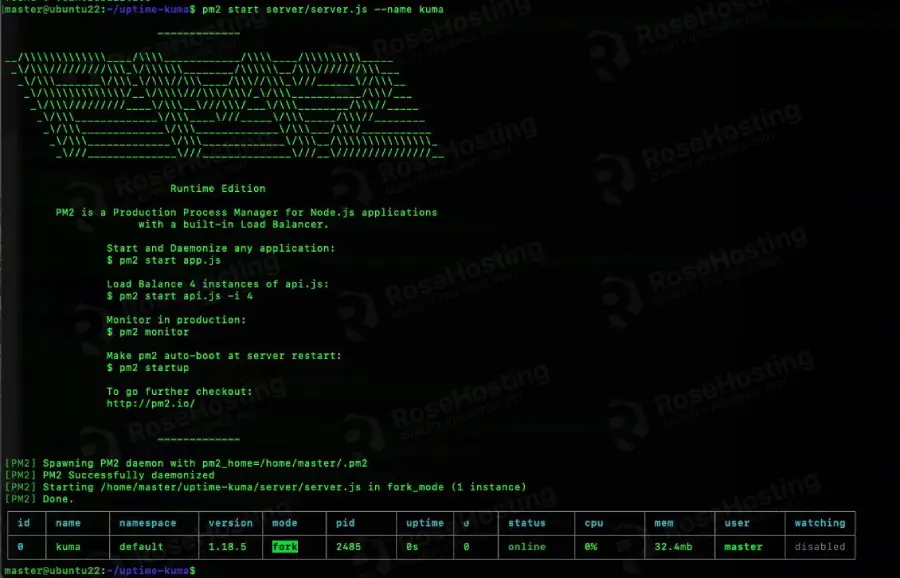
Step 5. Install PM2
With Process Manager (PM2), we can keep our applications alive forever, reload them without downtime, and facilitate common system admin tasks. Execute the command below to install PM2 on your Ubuntu 22.04.
$ sudo npm install pm2 -g
Once pm2 is installed, we can run our Uptime Kuma with this command.
$ pm2 start server/server.js --name kuma
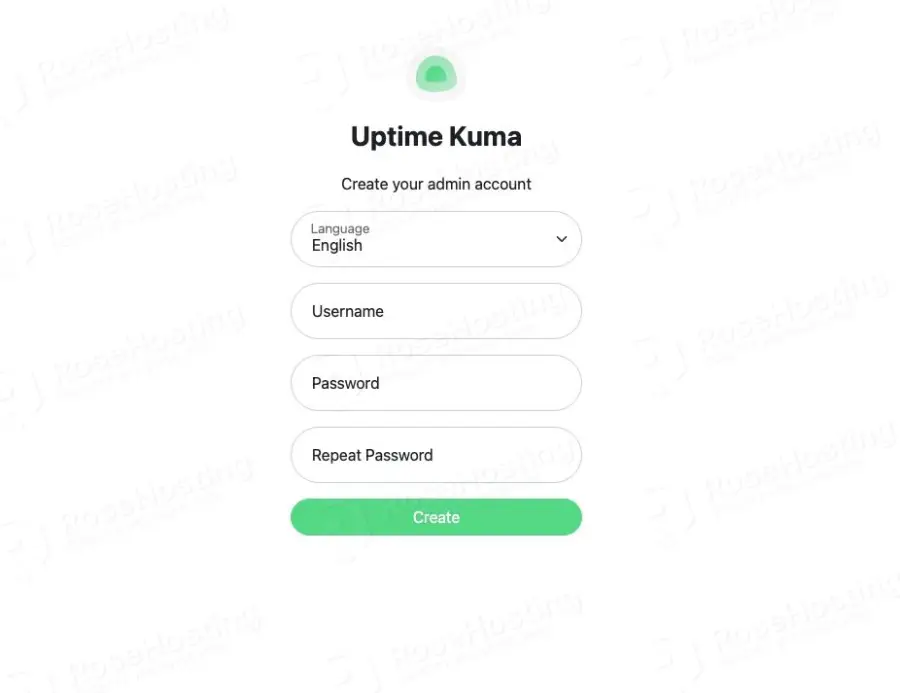
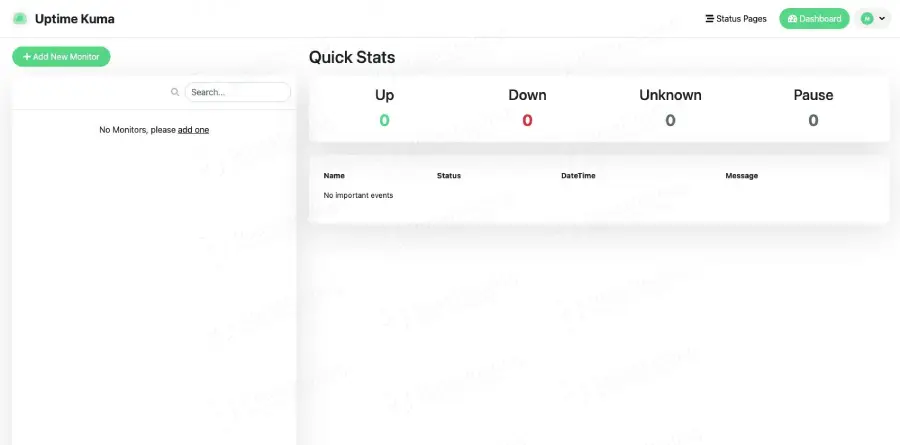
Now, you can open your web browser and navigate to the page at http://YOUR_SERVER_IP_ADDRESS:3001, and you will see the uptime Kuma welcome page, you can create a new user now.
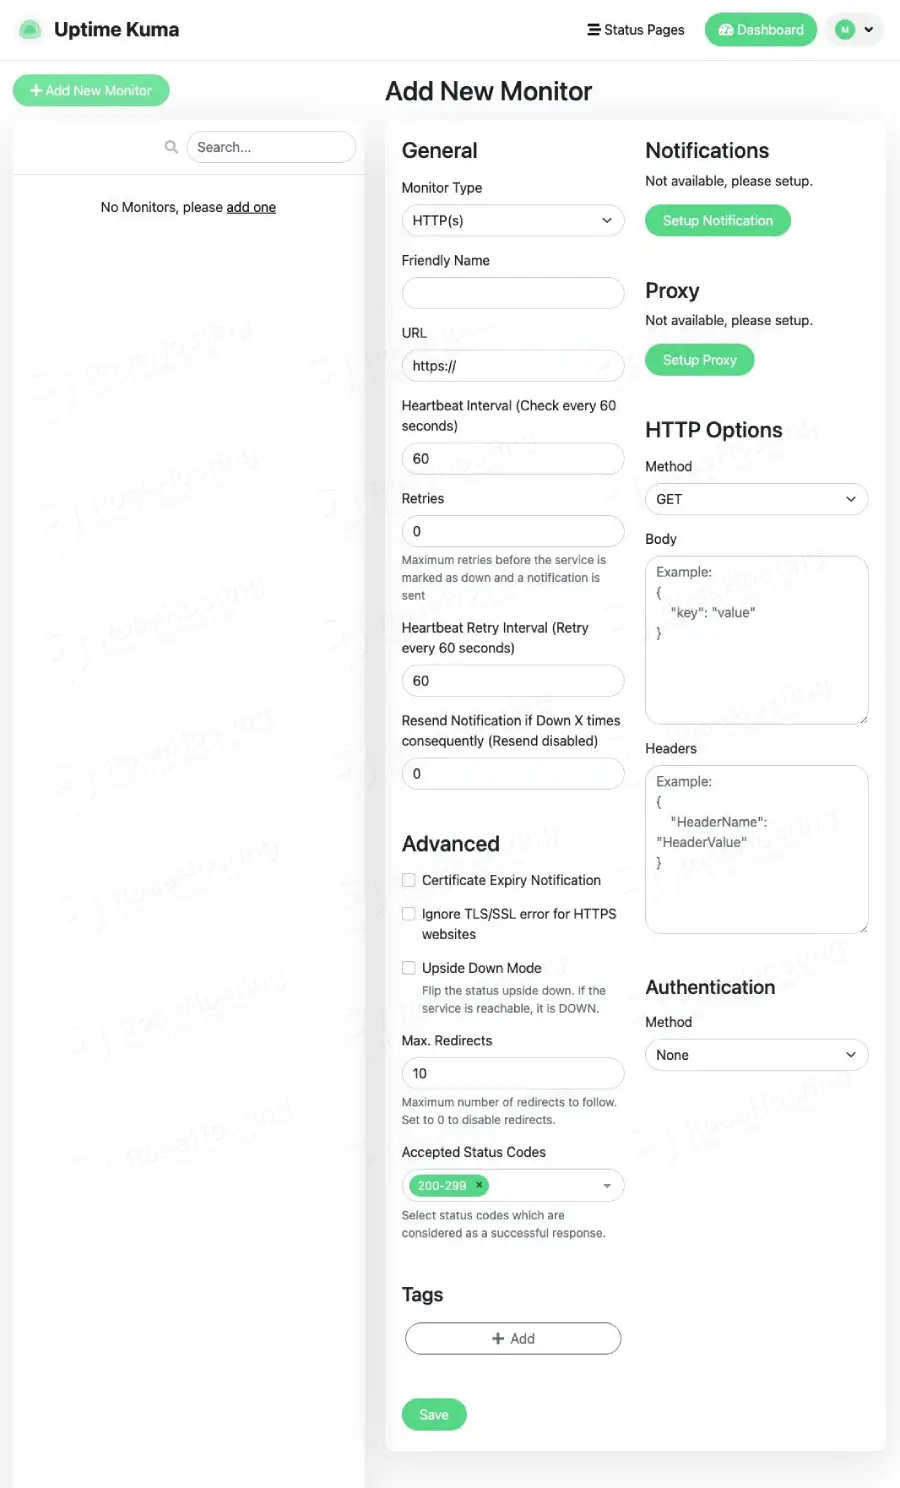
To add monitoring, you can click on the ‘Add New Monitor’ button
You can customize and configure your monitoring here.
After starting Uptime Kuma, we can create a service file for PM2 to make Uptime Kuma start automatically upon reboot.
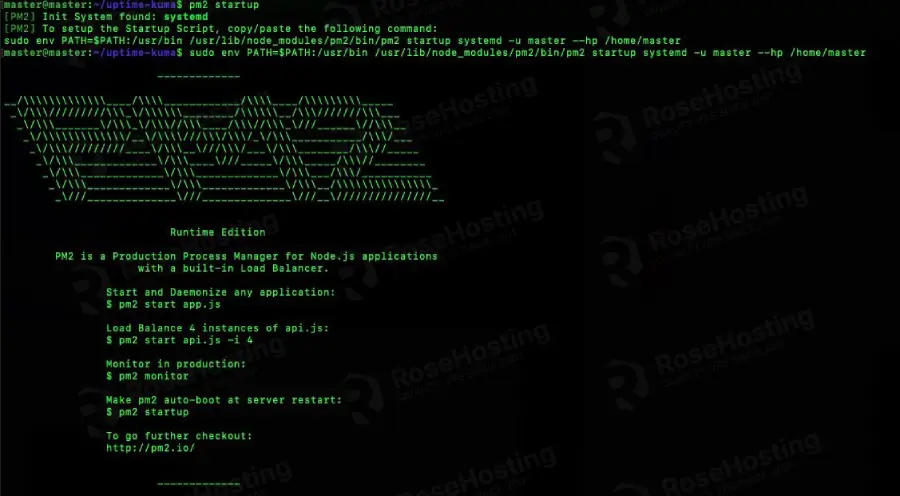
$ pm2 startup
You will get an output like this:
[PM2] Init System found: systemd
[PM2] To setup the Startup Script, copy/paste the following command:
sudo env PATH=$PATH:/usr/bin /usr/lib/node_modules/pm2/bin/pm2 startup systemd -u master --hp /home/master
Just follow the instruction shown on the screen, for example:
$ sudo env PATH=$PATH:/usr/bin /usr/lib/node_modules/pm2/bin/pm2 startup systemd -u master --hp /home/master
Then, you will also see an output like this one:
Now we need to save the current ongoing process:
$ pm2 save
Step 6. Install and Configure NGINX
Your Uptime Kuma install has now been completed, and you should be able to access it at your server’s public IP with port number 3001. However, if you want to access your Uptime Kuma website using a domain name or subdomain name instead of typing the server’s IP address and the port number in the URL, you would need to configure a reverse proxy on your server.
This step will show you how to implement the reverse proxy configuration using Nginx.
First, install Nginx with the following command:
$ sudo apt install nginx
On Ubuntu 22.04, Nginx is configured to start running upon installation; you can check it by running this command:
$ sudo systemctl status nginx
Once installed, create a new Nginx server block configuration file. Replace kuma.yourdomain.com with your actual domain or subdomain name:
$ sudo nano /etc/nginx/sites-enabled/kuma.yourdomain.com.conf
Add the following content to the file:
server {

listen 80;
server_name kuma.yourdomain.com;
location / {
    proxy_pass http://localhost:3001;
    proxy_http_version 1.1;
    proxy_set_header Upgrade $http_upgrade;
    proxy_set_header Connection "upgrade";
    proxy_set_header Host $host;
    }

location ~ /.well-known {
    alias /var/www/html;
    }
}
Save the file by pressing CTRL + O, then press CTRL + X to exit the nano editor, then restart Nginx.
$ sudo systemctl restart nginx
Step 7. Install SSL certificate
This is an optional step but highly recommended to complete. We will install a free SSL certificate from Let’s Encrypt.
$ sudo apt install python3-certbot-nginx -y
Once completed, we can run this command to install the SSL certificate.
$ sudo certbot certonly -d kuma.yourdomain.com
Saving debug log to /var/log/letsencrypt/letsencrypt.log

How would you like to authenticate with the ACME CA?
- - - - - - - - - - - - - - - - - - - - - - - - - - - - - - - - - - - - - - - -
1: Nginx Web Server plugin (nginx)
2: Spin up a temporary webserver (standalone)
3: Place files in webroot directory (webroot)
- - - - - - - - - - - - - - - - - - - - - - - - - - - - - - - - - - - - - - - -
Select the appropriate number [1-3] then [enter] (press 'c' to cancel): 1
Enter email address (used for urgent renewal and security notices)
(Enter 'c' to cancel): [email protected]

- - - - - - - - - - - - - - - - - - - - - - - - - - - - - - - - - - - - - - - -
Please read the Terms of Service at
https://letsencrypt.org/documents/LE-SA-v1.2-November-15-2017.pdf. You must
agree in order to register with the ACME server. Do you agree?
- - - - - - - - - - - - - - - - - - - - - - - - - - - - - - - - - - - - - - - -
(Y)es/(N)o: y

- - - - - - - - - - - - - - - - - - - - - - - - - - - - - - - - - - - - - - - -
Would you be willing, once your first certificate is successfully issued, to
share your email address with the Electronic Frontier Foundation, a founding
partner of the Let's Encrypt project and the non-profit organization that
develops Certbot? We'd like to send you email about our work encrypting the web,
EFF news, campaigns, and ways to support digital freedom.
- - - - - - - - - - - - - - - - - - - - - - - - - - - - - - - - - - - - - - - -
(Y)es/(N)o: n
Account registered.
Requesting a certificate for kuma.yourdomain.com

Successfully received certificate.
Certificate is saved at: /etc/letsencrypt/live/kuma.yourdomain.com/fullchain.pem
Key is saved at: /etc/letsencrypt/live/kuma.yourdomain.com/privkey.pem
This certificate expires on 2023-01-19.
These files will be updated when the certificate renews.
Certbot has set up a scheduled task to automatically renew this certificate in the background.

- - - - - - - - - - - - - - - - - - - - - - - - - - - - - - - - - - - - - - - -
If you like Certbot, please consider supporting our work by:
* Donating to ISRG / Let's Encrypt: https://letsencrypt.org/donate
* Donating to EFF: https://eff.org/donate-le
- - - - - - - - - - - - - - - - - - - - - - - - - - - - - - - - - - - - - - - -
master@ubuntu22:~#
Make sure to pay attention to these lines; we need them when editing our nginx server block.
Certificate is saved at: /etc/letsencrypt/live/kuma.yourdomain.com/fullchain.pem
Key is saved at: /etc/letsencrypt/live/kuma.yourdomain.com/privkey.pem
Next, we need to edit the nginx server block for kuma.yourdomain.com
$ sudo nano /etc/nginx/sites-enabled/kuma.yourdomain.com.conf
Replace the content with the lines below.
server {
    listen 443 ssl http2;
    server_name kuma.yourdomain.com;
    ssl_certificate /etc/letsencrypt/live/kuma.yourdomain.com/fullchain.pem;
    ssl_certificate_key /etc/letsencrypt/live/kuma.yourdomain.com/privkey.pem;

location / {
    proxy_set_header X-Real-IP $remote_addr;
    proxy_set_header X-Forwarded-For $proxy_add_x_forwarded_for;
    proxy_set_header Host $host;
    proxy_pass http://localhost:3001/;
    proxy_http_version 1.1;
    proxy_set_header Upgrade $http_upgrade;
    proxy_set_header Connection "upgrade";
    }
}

server {
    listen 80;
    server_name kuma.yourdomain.com;
    return 301 https://kuma.yourdomain.com$request_uri;
}
Save the file, then exit and restart nginx
$ sudo systemctl restart nginx
Now, you should be able to access your Uptime Kuma website in HTTPS mode at https://kuma.yourdomain.com; you can proceed with building your application using the Uptime Kuma.
Of course, you don’t have to pull your hair to install Uptime Kuma on Ubuntu 22.04 if you have a managed Linux VPS hosting plan hosted with us. If you do, you can simply ask our support team to install Uptime Kuma on Ubuntu 22.04 for you. They are available 24/7 and will be able to help you with the installation of Uptime Kuma, as well as any additional requirements that you may have.
PS. If you enjoyed reading this blog post on how to install Uptime Kuma on Ubuntu 22.04, feel free to share it on social networks or simply leave a comment down in the comments section. Thank you.
