
Drupal is open-source software that has many features, like easy content authoring, reliable performance, and excellent security. With Drupal tools, you can build the versatile, structured content that dynamic web experiences need. As an open-source web content management system (CMS) written in PHP, it is a great alternative to another CSM like WordPress or Joomla. In this tutorial, we will show you how to install Drupal 9 on Ubuntu 20.04 (Focal Fossa).
Prerequisites
- Ubuntu 20.04
- root SSH access or a regular user with sudo privileges
1. Log in via SSH and update the system
Log in to your Ubuntu 20.04 VPS with SSH as a root user or as a regular user with sudo privileges
ssh master@IP_Address -p Port_number
Remember to replace IP_Address and Port_Number with your server’s actual IP address and SSH port number respectively.
You can check whether you have the proper Ubuntu version installed on your server with the following command:
$ lsb_release -a
You should get this output:
No LSB modules are available.
Distributor ID: Ubuntu
Description: Ubuntu 20.04.3 LTS
Release: 20.04
Codename: focal
Then, run the following command to make sure that all installed packages on the server are updated to the latest available version
$ sudo apt update && sudo apt upgrade
2. Install and Configure Web server
Drupal 9 supports many webservers, like Apache, nginx, LiteSpeed, even Microsoft IIS. In this tutorial, we will show you how to install Drupal 9 using apache or nginx on your Ubuntu 20.04. Drupal will be installed in directory /var/www/html/drupal. For this purpose, we need to create the directory.
$ sudo mkdir /var/www/html/drupal
a. apache
If you want to use Apache, run this command to install it from the repository.
$ sudo apt install apache2
Once installed, Apache will run and we can start creating a virtual host.
$ sudo nano /etc/apache2/sites-available/drupal.conf
Paste the following in to /etc/apache2/sites-available/drupal.conf file.
<VirtualHost *:80>
     ServerName drupal.rosehosting.com
     ServerAlias drupal.rosehosting.com
     ServerAdmin [email protected]
     DocumentRoot /var/www/html/drupal/

     CustomLog ${APACHE_LOG_DIR}/access.log combined
     ErrorLog ${APACHE_LOG_DIR}/error.log

      <Directory /var/www/html/drupal>
            Options Indexes FollowSymLinks
            AllowOverride All
            Require all granted
            RewriteEngine on
            RewriteBase /
            RewriteCond %{REQUEST_FILENAME} !-f
            RewriteCond %{REQUEST_FILENAME} !-d
            RewriteRule ^(.*)$ index.php?q=$1 [L,QSA]
      </Directory>
</VirtualHost>
Save the file then exit from nano editor. To enable the virtual host, let’s run this command:
$ sudo a2ensite drupal
As you can see in the Apache virtual host above, it contains RewriteRule. By default, the Apache mod rewrite in Ubuntu is not enabled. So, we need to enable the module and restart Apache.
$ sudo a2enmod rewrite
$ sudo systemctl restart apache2
b. nginx
If you want to use nginx instead of apache, run this command to install it.
$ sudo apt install nginx
Now, let’s create an nginx server block to proceed with Drupal 9 installation.
$ sudo nano /etc/nginx/sites-enabled/drupal.conf
Paste the following contents in to the file
server {
    listen 80;

    root /var/www/html/drupal;

    index index.php index.html index.htm;

    server_name drupal.rosehosting.com;

    location / {
        try_files $uri $uri/ /index.php$is_args$args;
    }

    location = /favicon.ico { log_not_found off; access_log off; }
    location = /robots.txt { log_not_found off; access_log off; allow all; }
    location ~* \.(css|gif|ico|jpeg|jpg|js|png)$ {
        expires max;
        log_not_found off;
    }

    location ~ \.php$ {
        try_files $uri =404;
        fastcgi_split_path_info ^(.+\.php)(/.+)$;
        fastcgi_pass unix:/var/run/php/php7.4-fpm.sock;
        fastcgi_index index.php;
        fastcgi_param SCRIPT_FILENAME $document_root$fastcgi_script_name;
        include fastcgi_params;
    }
}
Save the file then exit.
3. Install Database Server
Drupal 9 requires MariaDB 10.3+ or MySQL/Percona 5.7.8+ or higher, PostgreSQL 10.0 or higher, SQLite 3.26 or higher, the database server is needed to store your Drupal data. In this step, we will install MariaDB from Ubuntu repository.
Run the following command to install the MariaDB server from the official Ubuntu repositories:
$ sudo apt install mariadb-server mariadb-client -y
Once installed, MariaDB will run and it’s already configured to run after reboot, by default.
Next, secure the MariaDB installation using the following command:
$ sudo mysql_secure_installation
This script will set the MariaDB root password, disable remote root login and remove anonymous users as shown below:
Enter current password for root (enter for none):
Set root password? [Y/n] Y
New password:
Re-enter new password:
Remove anonymous users? [Y/n] Y
Disallow root login remotely? [Y/n] Y
Remove test database and access to it? [Y/n] Y
Reload privilege tables now? [Y/n] Y
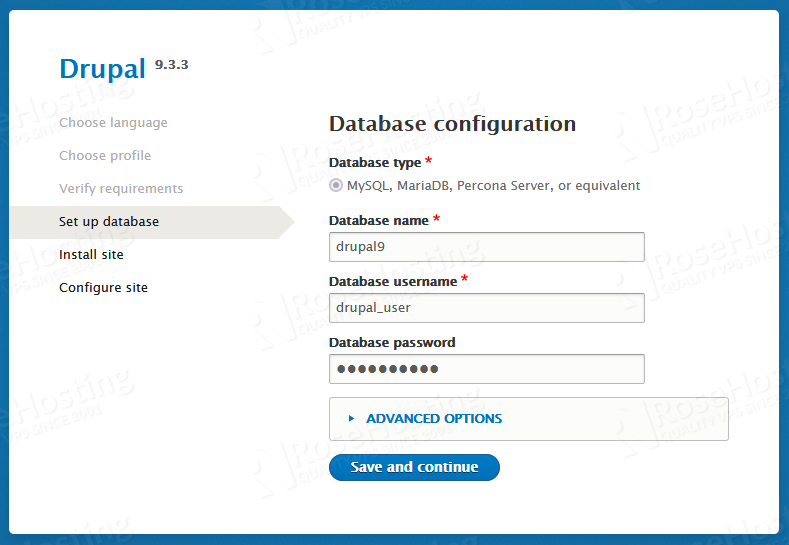
4. Create a Database
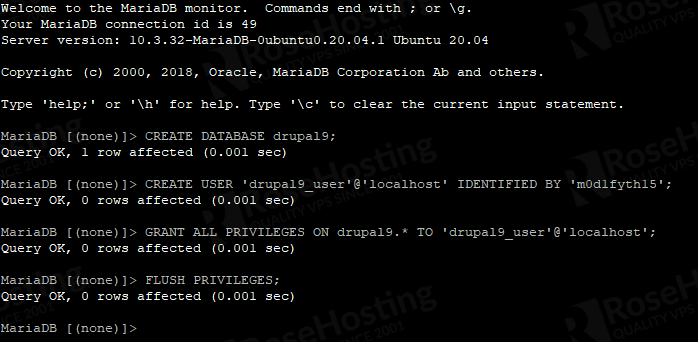
Login to the MySQL cli as the root user and execute the following commands:
$ mysql -u root -p
You will be prompted for your MySQL root password, you create the password in the previous step. And, once logged in, run these commands.
mysql> CREATE DATABASE drupal9;
mysql> CREATE USER 'drupal9_user'@'IP_address' IDENTIFIED BY 'm0d1fyth15';
mysql> GRANT ALL PRIVILEGES ON drupal9.* TO 'drupal9_user'@'IP_address';
mysql> FLUSH PRIVILEGES;
mysql> \q
Make sure to replace the ‘IP_address‘ is the IP address of your Ubuntu 20.04 server where Drupal 9 will be installed, or you can also use ‘localhost’. Do not forget to replace the PASSWORD ‘m0d1fyth15’ with a stronger and unique one.
5. Install PHP
In this section, we will install PHP 7.4. Rung the command below to install PHP 7.4
$ sudo apt install php7.4 libapache2-mod-php7.4 php7.4-{common,mbstring,xmlrpc,soap,gd,xml,intl,mysql,cli,zip,curl,fpm} -y
If you choose to use Apache, run this command and restart Apache.
$ sudo a2enmod php7.4
$ sudo systemctl restart apache2
If you choose nginx, simply restart nginx after installing PHP 7.4
$ sudo systemctl restart nginx
6. Install Drupal 9
In this section, we will download and install Drupal 9. At the time of writing this blog post, Drupal 9.3.3 is the latest version, you can check it at their release page at https://www.drupal.org/project/drupal. According to their documentation, this Drupal version 9.3.x will receive security coverage until December 8, 2022.
$ cd /var/www/html
$ sudo wget https://ftp.drupal.org/files/projects/drupal-9.3.3.tar.gz
Once downloaded, we need to extract the compressed file.
$ sudo tar xzvf drupal-9.3.3.tar.gz -C /var/www/html/drupal --strip-components=1
Then, change the permissions.
$ sudo chown -R www-data. /var/www/html/drupal
Navigate to http://yourdrupaldomain.com and initiate the installation.
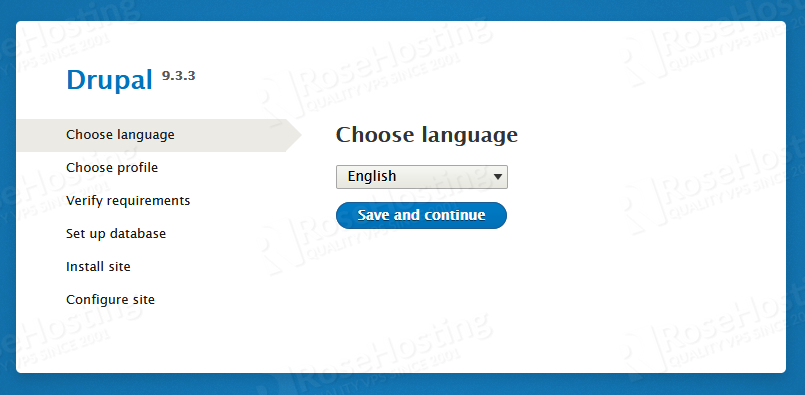
Choose your desired language then click on the save and continue button.
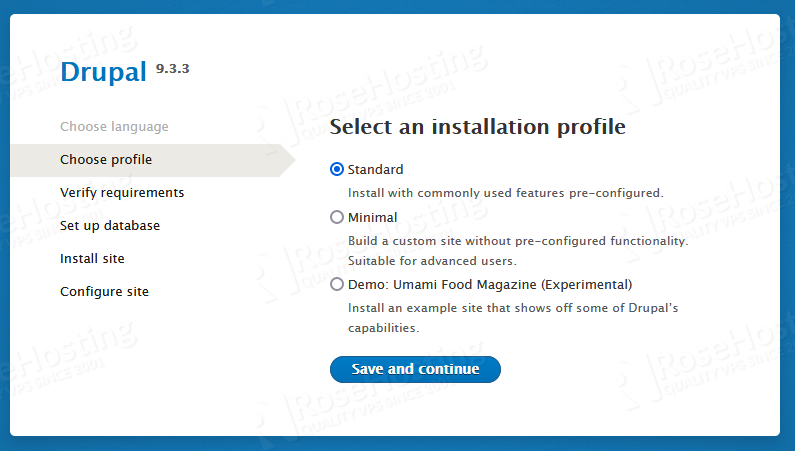
Once completed, you will be brought to the last step to configure your Drupal website.
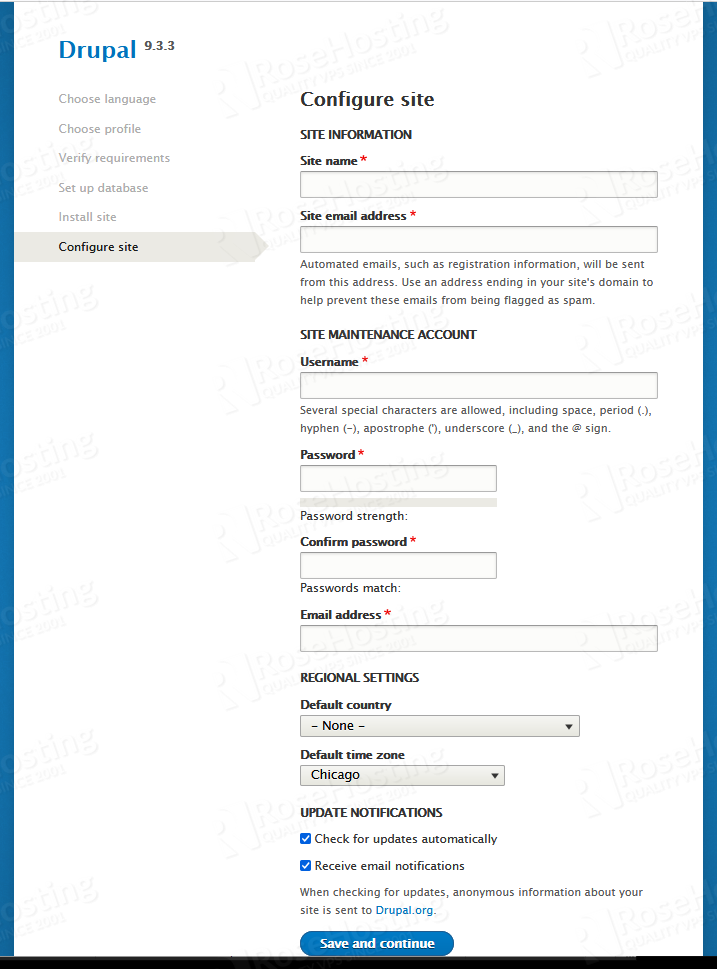
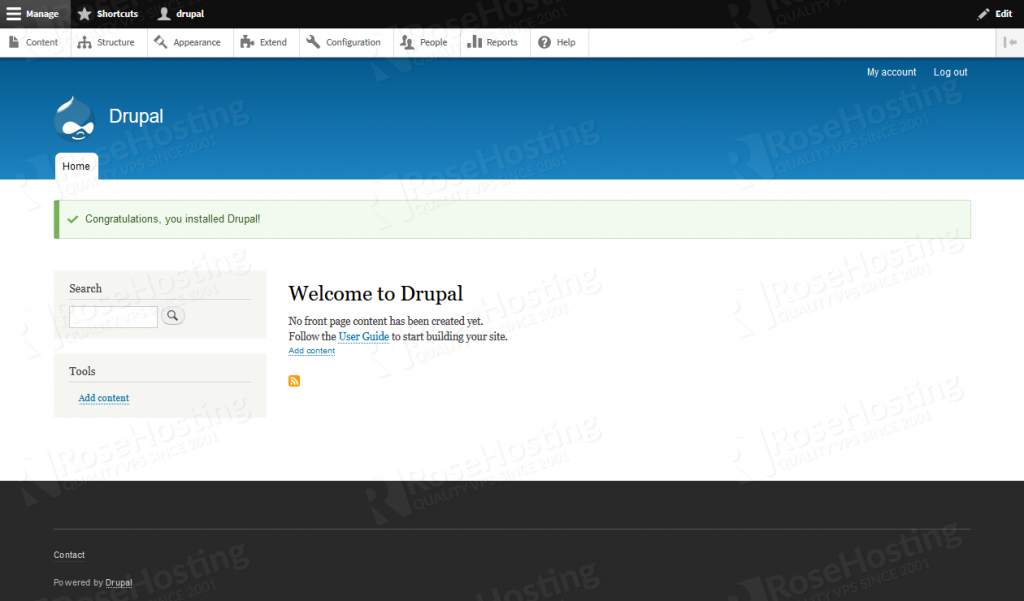
Fill the details then click on the save and continue button to finalize the installation. And that’s it, you will be automatically redirected to your Drupal website’s backend.
7. Install Free SSL Certificate
In this modern era, it is recommended to secure your website with an SSL certificate. This is not a mandatory step, but it provides secure connections for your Drupal instance.
First, install the Certbot client in your system to manage the SSL:
$ apt install python3-certbot-apache python3-certbot-nginx
Depends on what your webserver is, you can run one of these commands.
$ sudo certbot --apache
$ sudo certbot --nginx
Follow the steps when installing a free SSL certificate from Let’s Encrypt. You would see the output similar to this:
master@ubuntu20:~# sudo certbot --apache
Saving debug log to /var/log/letsencrypt/letsencrypt.log
Plugins selected: Authenticator apache, Installer apache
Enter email address (used for urgent renewal and security notices) (Enter 'c' to
cancel):

- - - - - - - - - - - - - - - - - - - - - - - - - - - - - - - - - - - - - - - -
Please read the Terms of Service at
https://letsencrypt.org/documents/LE-SA-v1.2-November-15-2017.pdf. You must
agree in order to register with the ACME server at
https://acme-v02.api.letsencrypt.org/directory
- - - - - - - - - - - - - - - - - - - - - - - - - - - - - - - - - - - - - - - -
(A)gree/(C)ancel: a
There seem to be problems with that address. Enter email address (used for
urgent renewal and security notices)

- - - - - - - - - - - - - - - - - - - - - - - - - - - - - - - - - - - - - - - -
Would you be willing to share your email address with the Electronic Frontier
Foundation, a founding partner of the Let's Encrypt project and the non-profit
organization that develops Certbot? We'd like to send you email about our work
encrypting the web, EFF news, campaigns, and ways to support digital freedom.
- - - - - - - - - - - - - - - - - - - - - - - - - - - - - - - - - - - - - - - -
(Y)es/(N)o: n

- - - - - - - - - - - - - - - - - - - - - - - - - - - - - - - - - - - - - - - -
Choose the domain/subdomain your are installing Drupal 9 for, and certbot will install the SSL certificate for it. You can also choose whether to redirect the HTTP traffic to HTTPS or not.
That’s it! You have successfully installed Drupal 9 on your Ubuntu 20.04 machine.
Of course, you don’t have to install Drupal 9 on your Ubuntu 20.04 server if you have a server with us, in which case you can simply ask our expert Linux hosting admins to set all of this up for you, quickly and easily. They are available 24×7 and will respond to your request immediately.
PS. If you liked this post, please share it with your friends on the social networks using the buttons below, or simply leave a comment down in the comments section. Thank you.

hi there are a couple of issues in the tutorial! i tried installing drupal on LXC container in proxmox. the Container hosts ubuntu 22.04.
when installing with apache2 the following command should be used to Disable the “It Works” site:
sudo a2dissite 000-default
the second issue is the mysql access grant to a user.
GRANT ALL PRIVILEGES ON wp.* TO ‘drupal9_user’@’IP_address’;
the database is drupal9 not wp
so the command should be
GRANT ALL PRIVILEGES ON drupal9.* TO ‘drupal9_user’@’IP_address’;
Thanks for noticing, we have now corrected our article.
Hi there,
First of all, thank you!
This manual is exactly what i was looking for, specially as the one in Drupal’s documentation is quiet inaccurate.
Second thing is, i just did the steps for Drupal 10 together with Ubuntu 22.04 & PHP 8.1 and it worked like a charme!
Of course you need edit the PHP install script and change 7.4 to 8.1, edit the wget downlaod to 10.0.4 and adjust the php version in the nginx config, but i guess that’s self explaining.
So thanks again! Nice job!
Hello,
I am a newbie in creating Webpages and would add replace the sentence ‘Navigate to http://yourdrupaldomain.com and initiate the installation’ with ‘Navigate to /drupal’. It took a couple of hours to check that I must use this path because there is my unziped file of drupal.