
In this tutorial, we will show you how to install SOPlanning on an Ubuntu 18.04 server along with installing the Apache web server.
 SOPlanning is a simple and open-source online planning tool designed to efficiently organize projects and tasks. It allows you to easily manage and plan your working tasks and assignments for each person of your team. This tool is very useful for any projects, small businesses, production plants, booking systems, vacation management systems, and so on. Let’s begin with the installation.
Requirements:
- For the purposes of this tutorial, we will be using an Ubuntu VPS.
- You will also need a working LAMP (Linux, Apache, MySQL, PHP) stack. If you don’t have one set up already, don’t worry – we will also show you how to install your own LAMP stack as a part of this tutorial.
- Full SSH root user access – or a user with sudo privileges – is also required.
Step 1: Connect to Your Server
Before we begin, you will need to connect to your server via SSH as the root user or as any other user that has sudo privileges.
To connect to your server as the root user, use the following command:
ssh root@IP_ADDRESS -p PORT_NUMBER
Make sure to replace IP_ADDRESS and PORT_NUMBER with your actual server IP address and SSH port number.
Once logged in, make sure that your server is up-to-date by running the following commands:
sudo apt update
sudo apt upgrade
Always keep your system updated, as it maximizes compatibility and performance of your server.
Step 2: Install Apache
Apache is a fast and secure web server – in fact, it’s one of the most popular and widely used web servers in the world. Its ease of use and quick and easy setup makes it perfect for this tutorial.
To install Apache on your Ubuntu 18.04 server, run the following command:
sudo apt install apache2
Once the installation is complete, enable the Apache service to start automatically upon system boot. You can do that with the following command:
sudo systemctl enable apache2
To verify that Apache is running, execute the following command:
sudo systemctl status apache2
Output:
● apache2.service - The Apache HTTP Server
   Loaded: loaded (/lib/systemd/system/apache2.service; enabled; vendor preset: enabled)
  Drop-In: /lib/systemd/system/apache2.service.d
           └─apache2-systemd.conf
   Active: active (running) since Fri 2019-06-21 15:04:25 CDT; 38s ago
  Process: 716 ExecStart=/usr/sbin/apachectl start (code=exited, status=0/SUCCESS)
 Main PID: 829 (apache2)
    Tasks: 6 (limit: 2321)
   CGroup: /system.slice/apache2.service
           ├─829 /usr/sbin/apache2 -k start
           ├─854 /usr/sbin/apache2 -k start
           ├─855 /usr/sbin/apache2 -k start
           ├─857 /usr/sbin/apache2 -k start
           ├─858 /usr/sbin/apache2 -k start
           └─859 /usr/sbin/apache2 -k start
You can also open your web browser and enter your server’s IP address, (e.g. http://your-ip-address). If Apache was successfully installed, you should see a message in your web browser saying “It works!”.
Step 3: Install MySQL
The next step is to install MySQL. It is one of the most popular database management systems.
To install MySQL on your system, type the following command and enter the character ‘Y’ when prompted:
sudo apt install mysql-server
During the installation, you will be asked to enter a password for the MySQL root user. Make sure to enter a strong password.
To further improve the security of our MySQL installation as well as set up a password for our MySQL root user, we need to run the mysql_secure_installation script and follow the on-screen instructions. Run the command below to configure your system:
sudo mysql_secure_installation
If the program asks you to enter your current MySQL root password, just press your [Enter] key once, as no password is set by default when installing MySQL.
A few more questions will be displayed on-screen – it is recommended that you answer yes to all of them by entering the character ‘Y’:
Remove anonymous users? (Press y|Y for Yes, any other key for No) : Y
Disallow root login remotely? (Press y|Y for Yes, any other key for No) : Y
Remove test database and access to it? (Press y|Y for Yes, any other key for No) : Y
Reload privilege tables now? (Press y|Y for Yes, any other key for No) : Y
Again, we can enable MySQL to start on boot with the following command:
sudo systemctl enable mysql
That’s it – MySQL has been installed and made more secure, and is now ready for use.
Step 4: Install PHP
The last step of our LAMP stack setup is to install PHP. Ubuntu 18.04 comes with PHP 7.2 by default.
We will also include some additional modules in order to help PHP to connect with our Apache and MySQL servers. On top of these, we will install modules that are required by our SOPlanning application.
To do this, type the following command:
sudo apt install php7.2 libapache2-mod-php7.2 php7.2-common php7.2-mysql php7.2-cli php7.2-opcache php7.2-gd php7.2-curl php7.2-cli php7.2-imap php7.2-mbstring php7.2-soap 7.2-xmlrpc php7.2-xml php7.2-zip
To verify that PHP 7.2 is successfully installed, run the following command:
php -v
You should get the following output on your screen:
PHP 7.2.10-0ubuntu0.18.04.1 (cli) (built: Sep 13 2018 13:45:02) ( NTS )
Copyright (c) 1997-2018 The PHP Group
Zend Engine v3.2.0, Copyright (c) 1998-2018 Zend Technologies
    with Zend OPcache v7.2.10-0ubuntu0.18.04.1, Copyright (c) 1999-2018, by Zend Technologies
Step 5: Download SOPlanning
We can now start with our SOPlanning setup and configuration.
We can download the latest SOPlanning version with the following command:
wget https://sourceforge.net/projects/soplanning/files/latest/download -O soplanning.zip
Next, to extract the file in the /var/www directory on your server, execute the following command:
sudo unzip soplanning.zip -d /var/www
The owner of the files needs to be the user of the web server running on your system. In our example, we are using the Apache web server and Apache runs under the “www-data” user on Ubuntu. To change the owner of the files, you can then run the following command:
sudo chown -R www-data:www-data /var/www/soplanning/
Step 6: Create the Database
Next, we need to create a new database. To do this, log in to your MySQL database server as the root user by typing the following command:
sudo mysql -u root -p
To create a new database and user, run the following commands on the MySQL shell:
CREATE DATABASE soplanning;
CREATE USER soplanning@localhost IDENTIFIED BY 'strong-password';
GRANT ALL PRIVILEGES ON soplanning.* TO soplanning@localhost;
FLUSH PRIVILEGES;
Note: Make sure to replace strong-password with an actual strong password.
To exit the MySQL database server command line, type:
exit
Step 7: Configure Apache
In this step, we will show you how to create a virtual host file for Apache – this is so you can access your SOPlanning installation using your domain name.
Create the virtual host file by executing the following command:
nano /etc/apache2/sites-available/soplanning.conf
And enter the following information:
<VirtualHost *:80>
     DocumentRoot /var/www/soplanning
     ServerName mydomain.com ServerAlias www.mydomain.com <Directory /var/www/soplanning/> Options FollowSymlinks AllowOverride All Require all granted </Directory> ErrorLog ${APACHE_LOG_DIR}/soplanning_error.log CustomLog ${APACHE_LOG_DIR}/soplanning_access.log combined </VirtualHost>
Make sure to replace mydomain.com with your actual domain name.
To enable the new SOPlanning virtual host, run the following command:
sudo a2ensite soplanning.conf
You should see the following output:
Enabling site soplanning.
To activate the new configuration, you need to run:
systemctl reload apache2
Reload your Apache in order to activate the new configuration:
sudo systemctl reload apache2
Step 8: Install and Access SOPlanning
You can now open your preferred web browser and access your SOPlanning installation at http://mydomain.com (of course, make sure to replace mydomain.com with the actual domain name you used when creating the Apache virtual server block).
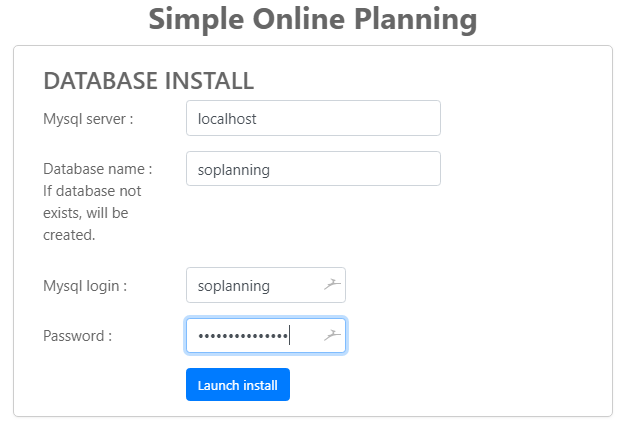
Enter your database information from Step 6 of the tutorial and click on the ‘Launch install’ button.
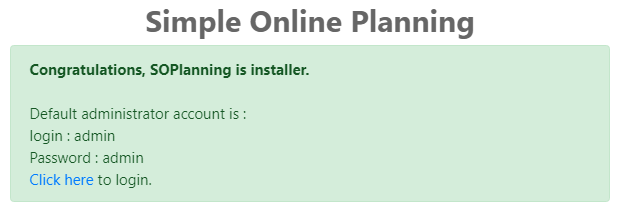
After the installation is completed, you will be provided with the default admin login credentials and a link to your admin login page.
Click on the link to login to your admin panel. Also, make sure to update your admin password as soon as you log in.
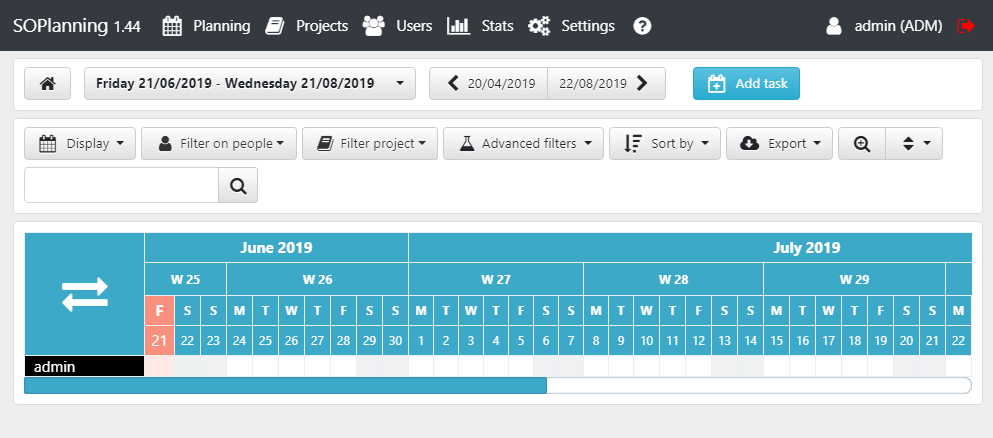
That’s it! SOPlanning has been successfully installed on your Ubuntu 18.04 server.
 Of course, you don’t have to install SOPlanning on Ubuntu 18.04 if you use one of our Managed Server Support Services with us. If you do, you can simply ask our support team to install SOPlanning on Ubuntu 18.04 for you, along with anything else that you might need. They are available 24/7 and will be able to help you with the installation.
PS. If you enjoyed reading this blog post on how to install SOPlanning on Ubuntu 18.04, feel free to share it on social networks using the shortcuts below, or simply leave a comment in the comments section. Thanks.
