
In this tutorial, we will show you how to install OTRS on Ubuntu 16.04. OTRS is a web-based ticketing system. It is one of the most flexible and super easy to use, web-based ticketing system, used for Help Desk, Service Management, Customer Service, and more. OTRS is a cross-platform application and supports all the popular operating systems, but this tutorial was written for Ubuntu 16.04 OS. At the time of writing this tutorial, the latest stable version is OTRS 6, and it requires:
- Perl 5.10 or higher
- MySQL – 5.0 higher, PostgreSQL 9.0 or higher, Oracle 10g or higher or MariaDB.
- Apache web server 2.2 or higher compiled with mod_perl2 or higher.
- Postfix, Sendmail, Exim or you can use an external email provider.
This install guide assumes that Apache and MySQL/MariaDB are already installed and configured on your virtual server.
Let’s start with the installation procedure.
1. Update the System Packages
Make sure your server Ubuntu 16.04 OS packages are fully up-to-date:
apt-get update
apt-get upgrade
2. Install the Required Packages
Install the required packages for OTRS:
apt-get install libapache2-mod-perl2 libdbd-mysql-perl libtimedate-perl libnet-dns-perl libdatetime-perl libauthen-ntlm-perl libjson-xs-perl libapache-dbi-perl libxml-libxml-perl libxml-libxslt-perl libyaml-perl libnet-ldap-perl libio-socket-ssl-perl libpdf-api2-perl libdbd-mysql-perl libsoap-lite-perl libtext-csv-xs-perl libtemplate-perl libcrypt-ssleay-perl libnet-https-any-perl libarchive-zip-perl libcrypt-eksblowfish-perl libencode-hanextra-perl libmail-imapclient-perl
3. Enable Required Apache Modules
Enable the Apache modules required for OTRS to function properly:
a2enmod deflate
a2enmod headers
a2enmod perl
4. Restart Apache
Restart the Apache service for the changes to take effect:
service apache2 restart
5. Download OTRS
Download the latest stable version of OTRS in a directory of your server (e.g. opt):
cd /opt
wget http://ftp.otrs.org/pub/otrs/otrs-6.0.5.zip
unzip otrs-*.zip
rm otrs-*.zip
mv otrs-* /opt/otrs
6. Create a OTRS user:
sudo useradd -d /opt/otrs -c 'OTRS user' otrs
sudo usermod -G www-data otrs
7. Create MySQL Database and User
Create a new MySQL database and user:
mysql -u root -p
mysql> SET GLOBAL sql_mode='';
mysql> CREATE DATABASE otrsdb character set UTF8 collate utf8_bin;
mysql> CREATE USER 'otrsuser'@'localhost' IDENTIFIED BY 'y0uR-pa5sW0rd';
mysql> GRANT ALL PRIVILEGES ON otrsdb.* TO 'otrsuser'@'localhost';
mysql> FLUSH PRIVILEGES;
mysql> quit
Do not forget to replace ‘y0uR-pa5sW0rd’ with a strong password.
Enable MySQL support:
nano /opt/otrs/scripts/apache2-perl-startup.pl
Remove the comment (# character) from the following lines:
use DBD::mysql ();
use Kernel::System::DB::mysql;
Edit the MySQL configuration file (/etc/mysql/mysql.conf.d/mysqld.cnf) and add following lines under the [mysqld] section:
max_allowed_packet   = 128M
query_cache_size     = 32M
innodb_log_file_size = 512M
Restart the MySQL service for the changes to take effect:
service mysql restart
9. Activate Default Config File and configure the Database settings:
cp /opt/otrs/Kernel/Config.pm.dist /opt/otrs/Kernel/Config.pm
nano /opt/otrs/Kernel/Config.pm
$Self->{Database} = 'otrsdb';
$Self->{DatabaseUser} = 'otrsuser';
$Self->{DatabasePw} = 'y0uR-pa5sW0rd';
10. Configure Apache for OTRS
sudo ln -s /opt/otrs/scripts/apache2-httpd.include.conf /etc/apache2/sites-available/otrs.conf
sudo a2ensite otrs
Set proper permissions to the /opt/otrs directory:
sudo /opt/otrs/bin/otrs.SetPermissions.pl --web-group=www-data
11. Install OTRS
Run the following script to check if all the required modules are installed.
perl /opt/otrs/bin/otrs.CheckModules.pl
Open http://your_server_ip/otrs/installer.pl in a web browser and follow the easy instructions: accept the license, select MySQL as database type, select ‘Use an existing database for OTRS’ and click on the ‘Next’ button. On the next page enter the following information:
User: ortsuser
Password: y0uR-pa5sW0rd
Host: 127.0.0.1
Database name: otrsdb
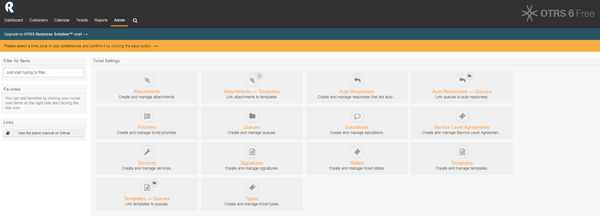
Click on the ‘Check database settings’ button and if the database check is successful, click on the ‘Next’ button and configure the Mail server settings (or skip that step and configure them later). On the next page you will be provided with the OTRS back-end URL and login credentials.
Log in at http://your_server_ip/otrs/index.pl , create new agents and work with these accounts instead the Superuser account.
Start the OTRS daemon and Cron.sh script as otrs user:
sudo su - otrs
/opt/otrs/bin/otrs.Daemon.pl start
/opt/otrs/bin/Cron.sh start
The OTRS daemon is responsible for handling any asynchronous and recurring tasks.
That is it. OTRS has been successfully installed.
Of course you don’t have to install OTRS on Ubuntu 16.04, if you use one of our Server Support Services plans in which case you can simply ask our expert Linux admins to install OTRS for you. They are available 24×7 and will take care of your request immediately.
PS. If you liked this post, on how to install OTRS on Ubuntu 16.04, please share it with your friends on the social networks using the buttons on the left or simply leave a reply below. Thanks.

I am not able to login after installation, please help me in this
What error do you get?
Did you check the log files?
i get the following error on step of configuring the database
Can’t connect to MySQL server on ‘127.0.0.1’ (111) , but mysql server is running
Please check bind-address in the my.cnf file or if you cannot find bind-address in the my.cnf file, then check in mysqld.cnf file.
i have the same problem, my user “root@localhost” and my password “****” cant grant access to site.
the answer is user or password incorrect.
i check the config.pm and have this config.
$Self->{DatabaseHost} = ‘127.0.0.1’;
# The database name
$Self->{Database} = ‘otrs_db’;
# The database user
$Self->{DatabaseUser} = ‘otrs’;
# The password of database user. You also can use bin/otrs.Console.pl Maint$
# for crypted passwords
$Self->{DatabasePw} = ‘password’;
Check if you can log in to MySQL console using the otrs user:
mysql -uotrs -p
Error: Please make sure your database accepts packages over 64 MB in size (it currently only accepts packages up to 4 MB). Please adapt the max_allowed_packet setting of your database in order to avoid errors.
I have modified as per instruction to changed to 64M but this error shows. Please help.