
In this tutorial, we will show you how to install MediaWiki on Ubuntu 18.04 server.
 MediaWiki is a free and open-source application that allows anyone to create a wiki website of their own on a self-hosted server. MediaWiki is one of the most popular wiki platforms in the world, thanks to its ease of use and great customizability. MediaWiki is written in the PHP programming language, which leads to excellent performance as well. Let’s get started with the installation.
Step 1: Connect to Your Server
To connect to the server via SSH as the root user, use the following command:
ssh root@IP_ADDRESS -p PORT_NUMBER
Then replace “IP_ADDRESS” and “PORT_NUMBER” with the actual server IP address and SSH port number (if necessary).
Step 2: Update the OS Packages
Before we can start with the MediaWiki installation, we have to make sure that all Ubuntu OS packages installed on the server are up to date. We can do this by running the following commands:
sudo apt-get update
sudo apt-get upgrade
Step 3: Install the Nginx Web Server
Check whether Apache is installed and running on your server:
ps aux | grep apache2
If Apache is already installed on the server, stop it and disable it from starting on server boot:
systemctl stop apache2.service
sudo systemctl disable apache2.service
Install Nginx:
sudo apt-get install nginx
Start the Nginx service and enable it to start on boot:
sudo systemctl start nginx.service
sudo systemctl enable nginx.service
Step 4: Install PHP 7.2 and Required PHP Extensions
Install PHP 7.2 and all the PHP extensions required to run MediaWiki.
sudo apt-get install imagemagick php7.2-fpm php7.2-intl php7.2-xml php7.2-curl php7.2-gd php7.2-mbstring php7.2-mysql php7.2-mysql php-apcu php7.2-zip
Edit the PHP-FPM configuration file:
nano /etc/php/7.2/fpm/php.ini
Add/modify the following lines:
file_uploads = On
allow_url_fopen = On
upload_max_filesize = 64M
memory_limit = 256M
max_execution_time = 600
date.timezone = America/Chicago
Restart the PHP-FPM service for the changes to take effect:
sudo systemctl restart php7.2-fpm.service
Step 5: Install MariaDB and Create a New Database
We will use MariaDB as a database engine. We can install the MariaDB server from the Ubuntu base repository using the following commands:
sudo apt-get update
sudo apt-get install mariadb-server-10.1 mariadb-server-core-10.1
Once the MariaDB installation is complete, run the following commands to start the MariaDB service and enable it to run on server boot:
sudo systemctl start mariadb
sudo systemctl enable mariadb
Log in to the MariaDB server as root user, create a new database and assign a MariaDB user with privileges for accessing and modifying the newly created MediaWiki database:
mysql -uroot
MariaDB [(none)]> create database mediawikidb;
MariaDB [(none)]> grant all privileges on mediawikidb.* to mediawiki@'localhost' identified by '5tr0ngPa55w0rd';
MariaDB [(none)]> flush privileges;
MariaDB [(none)]> quit;
Do not forget to replace ‘5tr0ngPa55w0rd’ with a strong password (a combination of letters and numbers and ideally more than 10 characters in length).
Step 6: Install a New SSL Certificate
We can automatically enable HTTPS on the MediaWiki website with Certbot:
sudo add-apt-repository ppa:certbot/certbot
sudo apt install python-certbot-nginx
certbot --nginx certonly -d your-domain.com -d www.your-domain.com
Do not forget to replace ‘your-domain.com‘ with your actual domain name.
Step 7: Create an Nginx Virtual Block
In order to access the MediaWiki instance with a domain name, we need to create a virtual host. To do this, create a new Nginx configuration file named ‘your-domain.com.conf’ on the virtual server:
nano /etc/nginx/sites-available/your-domain.com.conf
Add the following lines:
server {
     listen 80;
     server_name your-domain.com www.your-domain.com;
     return 301 https://$host$request_uri;
 }

 server {

     listen 443 ssl http2;

     server_name your-domain.com www.your-domain.com;
     root /var/www/mediawiki;

     index index.php;

     ssl_certificate /etc/letsencrypt/live/your-domain.com/fullchain.pem;
     ssl_certificate_key /etc/letsencrypt/live/your-domain.com/privkey.pem;

     client_max_body_size 5m;
     client_body_timeout 30;

        location / {
                try_files $uri $uri/ /index.php;
        }

        location ~ /.well-known {
            allow all;
        }

        location ~ /\.ht {
          deny all;
         }

     location ~ \.php$ {
         fastcgi_pass unix:/run/php/php7.2-fpm.sock;
         fastcgi_param SCRIPT_FILENAME $document_root$fastcgi_script_name;
         include fastcgi_params;
         include snippets/fastcgi-php.conf;
     }

     location ~* \.(js|css|png|jpg|jpeg|gif|ico)$ {
         try_files $uri /index.php;
         expires max;
         log_not_found off;
     }

     location = /_.gif {
         expires max;
         empty_gif;
     }

     location ^~ ^/(cache|includes|maintenance|languages|serialized|tests|images/deleted)/ {
         deny all;
     }

     location ^~ ^/(bin|docs|extensions|includes|maintenance|mw-config|resources|serialized|tests)/ {
         internal;
     }

     # Security for 'image' directory
     location ~* ^/images/.*.(html|htm|php|shtml)$ {
         types { }
         default_type text/plain;
     }

     # Security for 'image' directory
     location ^~ /images/ {
         try_files $uri /index.php;
     }

 }
Enable the Nginx virtual block:
ln -sf /etc/nginx/sites-available/your-domain.com.conf /etc/nginx/sites-enabled/your-domain.com.conf
Check if everything is OK with the Nginx configuration:
nginx -t
nginx: the configuration file /etc/nginx/nginx.conf syntax is ok
nginx: configuration file /etc/nginx/nginx.conf test is successful
Restart the Nginx web server for the changes to take effect:
systemctl restart nginx
Step 8: Download and Install MediaWiki
Download MediaWiki from the official MediaWiki website and extract it in a directory on your server ( e.g. /var/www/mediawiki):
cd /opt
wget -O mediawiki.tar.gz https://releases.wikimedia.org/mediawiki/1.32/mediawiki-1.32.0.tar.gz
sudo tar -zxvf mediawiki.tar.gz
sudo mkdir -p /var/www/mediawiki
sudo mv mediawiki*/* /var/www/mediawiki
Change the owner of the MediaWiki directory to the ‘www-data’ user and group:
chown -R www-data:www-data /var/www/mediawiki
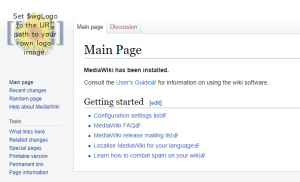
Open https://your-domain.com in your preferred web browser and follow the simple instructions.
Choose a language and click ‘Continue’, perform environment checking. If everything is OK, click ‘Continue’. Enter ‘mediawikidb’ in the ‘Database name’ field, type the database user ‘mediawiki’ and password of the ‘mediawiki’ MySQL user, then click ‘Continue’. On the next page, create an administrator user account. Type your admin username, password, and email address. Download the ‘LocalSettings.php’ file in the /var/www/mediawiki directory on your server. Change the owner and group of LocalSettings.php file:
chown www-data:www-data /var/www/mediawiki/LocalSettings.php
That is it. We successfully installed MediaWiki with nginx web server on an Ubuntu 18.04 VPS. We can now proceed to the admin panel and configure MediaWiki, install additional extensions, etc.
 Of course, you don’t have to install and configure MediaWiki on Ubuntu 18.04 if you use one of our Fully-Managed VPS Support solutions, in which case you can simply ask our expert Linux admins to setup and configure MediaWiki on Ubuntu 18.04 for you. They are available 24×7 and will take care of your request immediately.
PS. If you liked this post on how to install MediaWiki on an Ubuntu 18.04 VPS, please share it with your friends on the social networks using the share shortcut buttons, or simply leave a reply below. Thanks.

Excellent tutorial. Worked as expected.
$ sudo apt-get install imagemagick php7.2-fpm php7.2-intl php7.2-xml php7.2-curl php7.2-gd php7.2-mbstring php7.2-mysql php7.2-mysql php-apcu php7.2-zip
Reading package lists… Done
Building dependency tree
Reading state information… Done
E: Unable to locate package php7.2-fpm
E: Couldn’t find any package by glob ‘php7.2-fpm’
E: Couldn’t find any package by regex ‘php7.2-fpm’
E: Unable to locate package php7.2-intl
E: Couldn’t find any package by glob ‘php7.2-intl’
E: Couldn’t find any package by regex ‘php7.2-intl’
E: Unable to locate package php7.2-xml
E: Couldn’t find any package by glob ‘php7.2-xml’
E: Couldn’t find any package by regex ‘php7.2-xml’
E: Unable to locate package php7.2-curl
E: Couldn’t find any package by glob ‘php7.2-curl’
E: Couldn’t find any package by regex ‘php7.2-curl’
E: Unable to locate package php7.2-gd
E: Couldn’t find any package by glob ‘php7.2-gd’
E: Couldn’t find any package by regex ‘php7.2-gd’
E: Unable to locate package php7.2-mbstring
E: Couldn’t find any package by glob ‘php7.2-mbstring’
E: Couldn’t find any package by regex ‘php7.2-mbstring’
E: Unable to locate package php7.2-mysql
E: Couldn’t find any package by glob ‘php7.2-mysql’
E: Couldn’t find any package by regex ‘php7.2-mysql’
E: Unable to locate package php7.2-mysql
E: Couldn’t find any package by glob ‘php7.2-mysql’
E: Couldn’t find any package by regex ‘php7.2-mysql’
E: Unable to locate package php7.2-zip
E: Couldn’t find any package by glob ‘php7.2-zip’
E: Couldn’t find any package by regex ‘php7.2-zip’
You need to install PHP7.2 on your system by following the command below:
sudo add-apt-repository ppa:ondrej/php
sudo apt-get update
sudo apt-get install php7.2
Then install the PHP extensions again.
Thanks. my version was 7.4, so i simply changed .2 to .4 in the codes.
Excellent post. However, I would have added a case where one wants to install mediawiki on the local network, where a domain name is not registered and HTTPS is not required. 🙂