
 Mahara is a free and open-source electronic portfolio management system written in PHP. It is a web-based application mainly used in academic institutions to provide a platform to share their knowledge. It helps you to create a digital classroom and organize a student’s progress. You can also create a blog, build a resume, file repository, and a competency framework using Mahara. Compared to other Learning Management Systems, Mahara is distributed and user-focused.
In this tutorial, we will show you how to install Mahara on Ubuntu 20.04 server.
Prerequisites
- An Ubuntu 20.04 VPS (we’ll be using our SSD 2 VPS plan)
- Access to the root user account (or access to an admin account with root privileges)
Step 1: Log in to the Server & Update the Server OS Packages
First, log in to your Ubuntu 20.04 server via SSH as the root user:
ssh root@IP_Address -p Port_number
You will need to replace ‘IP_Address’ and ‘Port_number’ with your server’s respective IP address and SSH port number. Additionally, replace ‘root’ with the username of the admin account if necessary.
Before starting, you have to make sure that all Ubuntu OS packages installed on the server are up to date. You can do this by running the following commands:
apt-get update -y
apt-get upgrade -y
Step 2: Install LAMP Server
Mahara runs on a web server, written in PHP and uses MySQL or PostgreSQL as a database backend. So LAMP server must be installed in your server. If not installed, you can install it with the following command:
apt-get install apache2 mariadb-server php libapache2-mod-php php-mysql php-gd php-curl php-json php-xml php-mbstring -y
Once all the required packages are installed, edit the php.ini file and make some changes:
nano /etc/php/7.4/apache2/php.ini
Change the following lines:
log_errors = On
upload_max_filesize = 50M
post_max_size = 100M
And, add the following lines at the end of the file:
register_globals = Off
magic_quotes_runtime = Off
magic_quotes_sybase = Off
magic_quotes_gpc = Off
allow_call_time_pass_reference = Off
Save and close the file then restart the Apache service to apply the changes:
systemctl restart apache2
Step 3: Create a Database
Next, you will need to create a database and user for Mahara. First, connect to the MariaDB with the following command:
mysql
Once connected, create a database and user with the following command:
MariaDB [(none)]> create database maharadb character set utf8mb4;
MariaDB [(none)]> grant all on maharadb.* to 'mahara'@'localhost' identified by 'password';
Next, flush the privileges and exit from the MariaDB with the following command:
MariaDB [(none)]> flush privileges;
MariaDB [(none)]> exit;
Once the database is created, you can proceed to download Mahara.
Step 4: Install Mahara
First, visit the Mahara website and download the latest version of Mahara with the following command:
wget https://launchpad.net/mahara/20.10/20.10.0/+download/mahara-20.10.0.tar.bz2
Once the download is completed, extract the downloaded file with the following command:
bunzip2 mahara-20.10.0.tar.bz2
tar -xvf mahara-20.10.0.tar
Next, move the extracted directory to the Apache web root with the following command:
mv mahara-20.10.0 /var/www/html/mahara
Next, create a data directory for Mahara with the following command:
mkdir /var/www/html/mahara/data
Next, set the ownership and permissions with the following command:
chown -R www-data:www-data /var/www/html/mahara
chmod -R 755 /var/www/html/mahara
Next, change the directory to Mahara and generate a secrets with the following command:
cd /var/www/html/mahara/htdocs
openssl rand -base64 32
You should get the following output:
QaU6HjHs6N93JIFX1bysH6OwmNP/QnDsIGI7MiX0Yag=
Next, rename the default config.php file:
cp config-dist.php config.php
Next, edit the config.php file and define database settings, data directory and secrets:
nano config.php
Change the following lines:
$cfg->dbtype   = 'mysql';
$cfg->dbhost   = 'localhost';
$cfg->dbport   = null; // Change if you are using a non-standard port number for your database
$cfg->dbname   = 'maharadb';
$cfg->dbuser   = 'mahara';
$cfg->dbpass   = 'password';
$cfg->dataroot = '/var/www/html/mahara/data';
$cfg->passwordsaltmain = 'QaU6HjHs6N93JIFX1bysH6OwmNP/QnDsIGI7MiX0Yag=';
$cfg->urlsecret = 'mysupersecret';
Save and close the file when you are finished.
Step 5: Configure Apache for Mahara
Next, create an Apache virtual host configuration file with the following command:
nano /etc/apache2/sites-available/mahara.conf
Add the following lines:
<VirtualHost *:80>
ServerAdmin [email protected]
DocumentRoot /var/www/html/mahara/htdocs/
ServerName mahara.example.com
<Directory /var/www/html/mahara/htdocs/>
Options FollowSymLinks
AllowOverride All
Order allow,deny
allow from all
</Directory>
ErrorLog /var/log/apache2/your-domain.com-error_log
CustomLog /var/log/apache2/your-domain.com-access_log common
</VirtualHost>
Save and close the file then enable the Apache virtual host with the following command:
a2ensite mahara.conf
Next, reload the Apache service to apply the changes:
systemctl reload apache2
Step 6: Setup a Cron Job
In order to update the RSS feeds and send email notifications, you will need to set a cron jobs that run every minute.
You can set up it with the following command:
crontab -e
Add the following line:
* * * * * php /var/www/html/mahara/htdocs/lib/cron.php
Save and close the file when you are finished.
Step 7: Access Mahara Web Interface
Now, open your web browser and access the Mahara web UI using the URL http://mahara.example.com. You will be redirected to the following page:
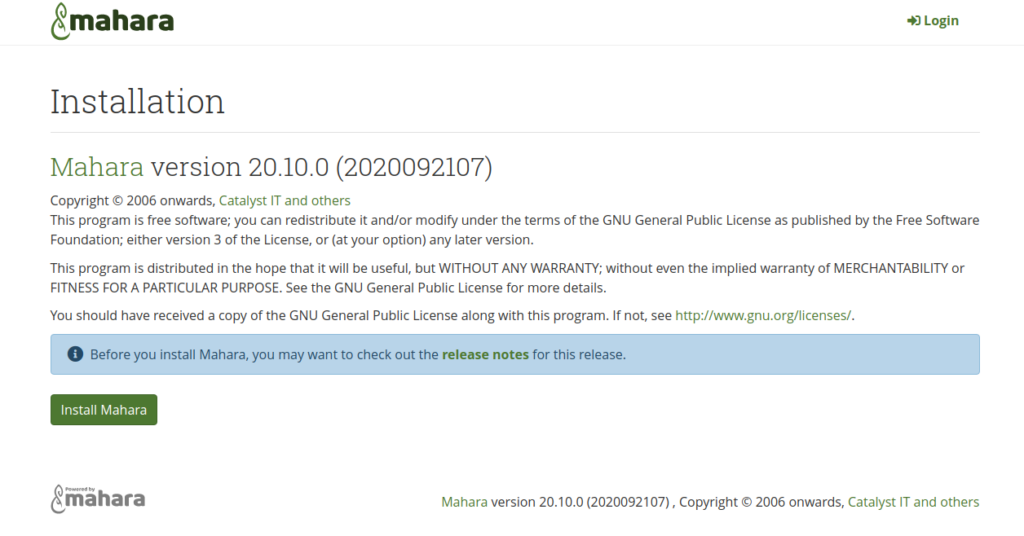
Click on the Install Mahara button to start the installation. Once the installation has been finished, you should see the following page:
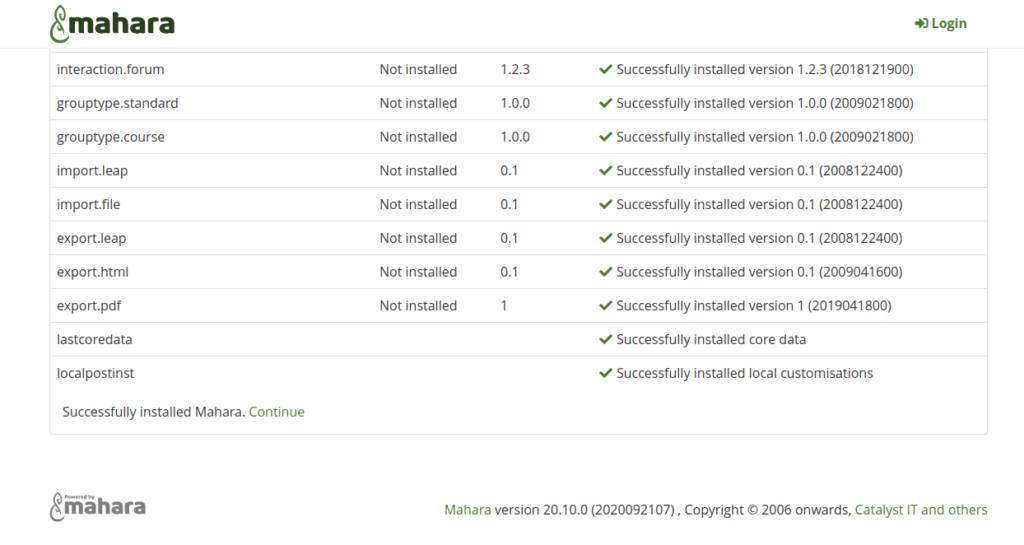
Click on the Continue button. You should see the following page:
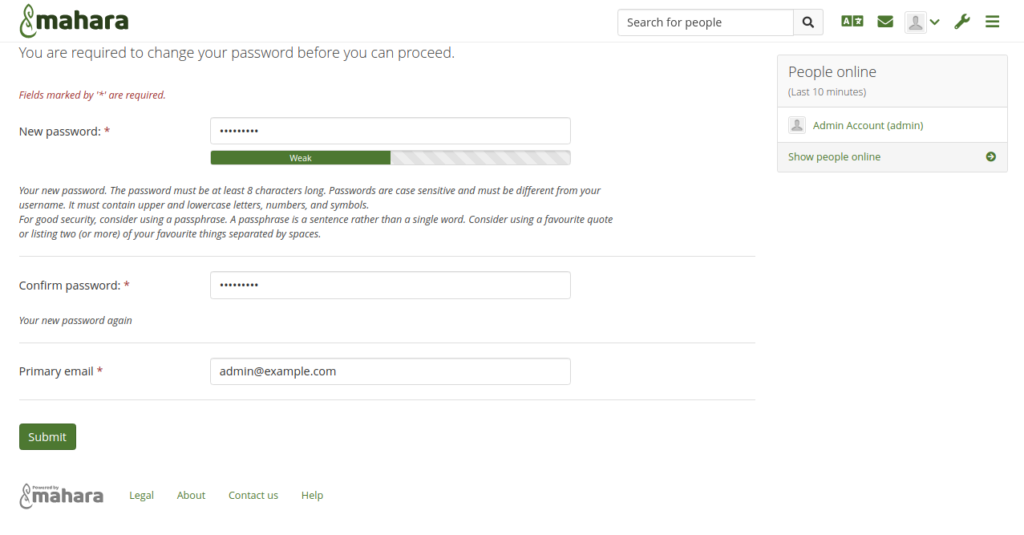
Set your admin password and click on the Submit button. You will be redirected to the Mahara dashboard in the following page:
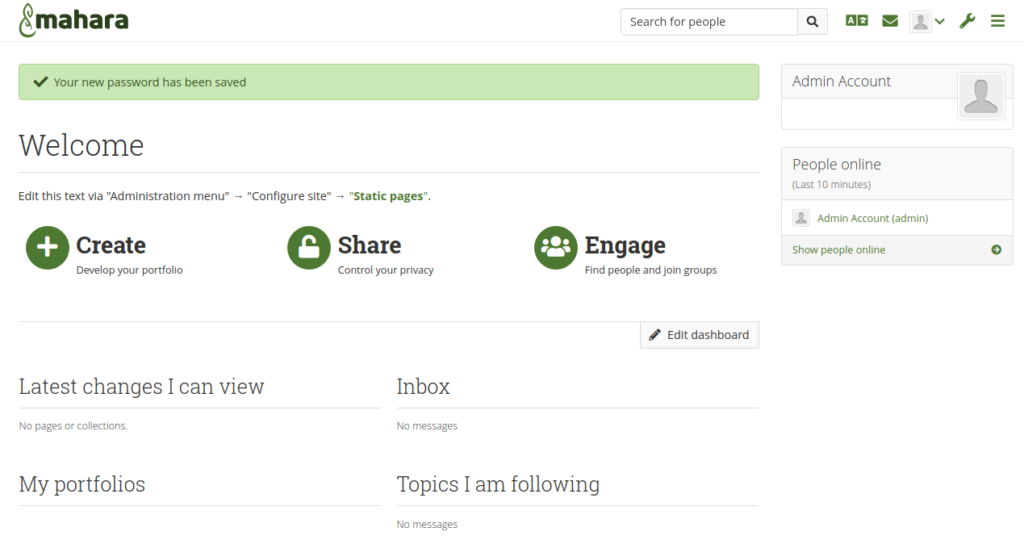
Congratulations! you have successfully installed Mahara on Ubuntu 20.04.
Of course, you don’t have to install Mahara on Ubuntu if you use one of our Server Support Services, in which case you can simply ask our expert Linux admins to install Mahara on Ubuntu, for you. They are available 24×7 and will take care of your request immediately.
PS. If you liked this post on how to install Mahara on Ubuntu, please share it with your friends on the social networks using the buttons on the left or simply leave a reply below. Thanks.
