

In this article, we will show you how to install and configure Gitea service on Ubuntu 18.04. One of the best alternatives for GitHub is Gitea. Git with a cup of tea, also known as Gitea, is an open-source application that is a fork of Gogs and is functionally very similar to GitHub, Bitbucket, and Gitlab.
 Gitea is written in the Go language and can be run anywhere that Go can be compiled, such as Linux, macOS, Windows, ARM and PowerPC architectures. Gitea has many features such as problems and time tracking, branch repository, file locking, and tagging, merging and more. By following the instructions below, you will install Nginx, MariaDB, Git, create a system user, install Gitea and configure Nginx as a reverse proxy. Lets begin.
Step 1. Connect to your Server
Before we begin, you need to connect to your server via SSH as the root user. To do this, use the following command:
ssh root@IP_Address -p Port_Number
of course, you will need to replace IP_Address and Port_Number with your actual server IP address and SSH port number. The default SSH port is 22, but it may be different for your server.
Once logged in, make sure that your server is up-to-date by running the following commands:
sudo apt update
sudo apt upgrade
Step 2. Install Nginx and Git
First, you need to install a web server to run Gitea. You can choose any web server that is available for Ubuntu 18.04 and install it on your server – however, in this tutorial we will be installing and using Nginx as our web server. It’s a very versatile and extremely popular web server, similar to Apache.
By executing the following command, you can install the Nginx Web server on your VPS.
sudo apt -y install nginx
When the installation will finish you can start Nginx and also enable it to start on server boot with these commands.
sudo systemctl start nginx.service
sudo systemctl enable nginx.service
We can also install a couple of dependencies that we’ll need in order to continue with the Gitea installation.
sudo apt -y install git wget
You can verify the installed git version with the command:
git --version
Output:
git version 2.17.1
Step 3. Install MariaDB Database Server
Gitea supports the following databases: MariaDB/MySQL, PostgreSQL, SQLite, and TiDB. However, in this tutorial, we will install and use the MariaDB server and client. To install the MariaDB server on your Ubuntu 18.04 Server, run the command:
sudo apt -y install mariadb-server mariadb-client
Once MariaDB is installed on your server, you can use the commands below so you can stop, start, and enable the MariaDB service.
sudo systemctl stop mariadb.service
sudo systemctl start mariadb.service
sudo systemctl enable mariadb.service
The next command is optional. You can run the command if you want to secure the MariaDB server by disallowing remote root access, removing the test database and creating a root password.
sudo mysql_secure_installation
When prompted, answer the questions below by following the guide.
Enter current password for root (enter for none): Just press the [Enter] key, no password is set
Set root password? [Y/n]: Y
New password: Enter your password
Re-enter new password: Repeat your password
Remove anonymous users? [Y/n]: Y
Disallow root login remotely? [Y/n]: Y
Remove test database and access to it? [Y/n]: Y
Reload privilege tables now? [Y/n]: Y
Restart the MariaDB server so that the changes will take effect.
sudo systemctl restart mariadb.service
Step 4. Create a Database
You should now be able to log in to the MariaDB server with the command:
sudo mysql -u root -p
Then type the password you created above to sign on. Once you are in the MariaDB shell, you can use the following command and create a database called ‘gitea’ for the Gitea application.
CREATE DATABASE gitea;
Next, create a database user called ‘giteauser’ and replace New_Str0n9_Pas$worD with your own password.
CREATE USER 'giteauser'@'localhost' IDENTIFIED BY 'New_Str0n9_Pas$worD';
To grant the user ‘giteauser’ with full access to the database ‘gitea’ run the command:
GRANT ALL ON gitea.* TO 'giteauser'@'localhost' IDENTIFIED BY 'New_Str0n9_Pas$worD' WITH GRANT OPTION;
Now we can use flush privileges operation to reload the grant tables and after that, we can exit from the MariaDB shell.
FLUSH PRIVILEGES;
EXIT;
Step 5. Prepare the Gitea Environment
Now we need to create a git user that can manage Gitea on the system. To do that, run the command below:
sudo adduser \
--system \
--shell /bin/bash \
--gecos 'Git Version Control' \
--group \
--disabled-password \
--home /home/git \
git
With the following commands, we will create the necessary directory structure and give them appropriate permissions.
sudo mkdir -p /var/lib/gitea/{custom,data,indexers,public,log}
sudo chown git:git /var/lib/gitea/{data,indexers,log}
sudo chmod 750 /var/lib/gitea/{data,indexers,log}
sudo mkdir /etc/gitea
sudo chown root:git /etc/gitea
sudo chmod 770 /etc/gitea
Step 6. Install Gitea
The current latest version of Gitea is 1.9, however, you can always check for a newer version so you can download and install it. Download Gitea version 1.9 with the following command:
sudo wget -O gitea https://dl.gitea.io/gitea/1.9/gitea-1.9-linux-amd64
Once the file will be downloaded, make it executable and move it into the /usr/local/bin directory.
sudo chmod +x gitea
sudo mv gitea /usr/local/bin/gitea
Step 7. Create a Service file to Start Gitea Automatically
We’ll also show you how to create a Gitea systemd script. Run the following command to create a new Gitea service:
sudo nano /etc/systemd/system/gitea.service
Then copy and paste the content below into the open file.
[Unit]
Description=Gitea (Git with a cup of tea)
After=syslog.target
After=network.target
#After=mysqld.service
#After=postgresql.service
#After=memcached.service
#After=redis.service

[Service]
# Modify these two values and uncomment them if you have
# repos with lots of files and get an HTTP error 500 because
# of that
###
#LimitMEMLOCK=infinity
#LimitNOFILE=65535
RestartSec=2s
Type=simple
User=git
Group=git
WorkingDirectory=/var/lib/gitea/
ExecStart=/usr/local/bin/gitea web -c /etc/gitea/app.ini
Restart=always
Environment=USER=git HOME=/home/git GITEA_WORK_DIR=/var/lib/gitea
# If you want to bind Gitea to a port below 1024 uncomment
# the two values below
###
#CapabilityBoundingSet=CAP_NET_BIND_SERVICE
#AmbientCapabilities=CAP_NET_BIND_SERVICE

[Install]
WantedBy=multi-user.target
Save and close the file.
In order for the changes to take effect, we’ll need to reload systemd. Start the new Gitea service, and if everything works as expected, you can enable this service:
sudo systemctl daemon-reload
sudo systemctl enable gitea
sudo systemctl start gitea
Step 8. Configure Nginx as a Reverse Proxy
Since Nginx has been installed already, we can continue and show you how to create an Nginx server block with a reverse proxy for your domain that you want to use. In the following command, we will use nano as our editor, but if you do not prefer nano, you can use any editor of your choice and create a new server block called git.conf
sudo nano /etc/nginx/sites-available/git.conf
Then paste the configuration from below into the file, and replace your_domain_name.com with your actual domain name.
upstream gitea {
    server 127.0.0.1:3000;
}

server {
    listen 80 default_server;
    server_name your_domain_name.com;
    root /var/lib/gitea/public;
    access_log off;
    error_log off;

    location / {
      try_files maintain.html $uri $uri/index.html @node;
    }

    location @node {
      client_max_body_size 0;
      proxy_pass http://gitea;
      proxy_set_header X-Forwarded-For $proxy_add_x_forwarded_for;
      proxy_set_header X-Real-IP $remote_addr;
      proxy_set_header Host $http_host;
      proxy_set_header X-Forwarded-Proto $scheme;
      proxy_max_temp_file_size 0;
      proxy_redirect off;
      proxy_read_timeout 120;
    }
}
After you finish editing the file, save and close it.
Once you have configured the Nginx server block, you can enable it by executing the following command:
sudo ln -s /etc/nginx/sites-available/git.conf /etc/nginx/sites-enabled
Remove the default Nginx server block with:
sudo rm /etc/nginx/sites-enabled/default
Restart Nginx so the changes will take effect.
sudo systemctl reload nginx.service
Now, open your preferred web browser and type your domain, and append slash install (/install) to the URL:
http://your_domain_name.com/install
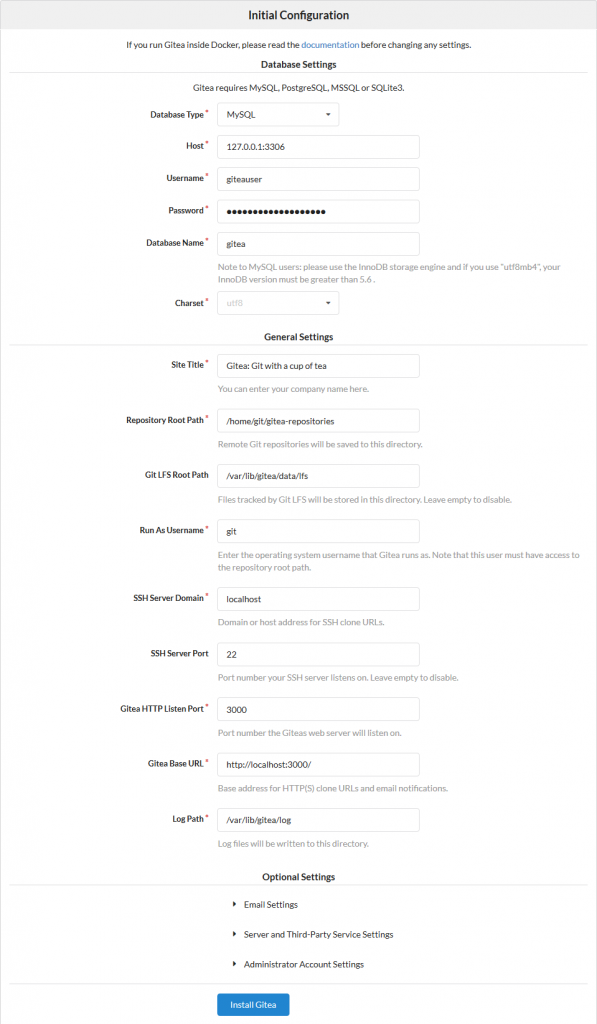
Follow the onscreen instructions to complete the Gitea setup.
That’s it! In this article, we showed you how to install Nginx, MariaDB, Git, create a system user, install Gitea and configure Nginx as a reverse proxy. Now you can start exploring this useful application.
 Of course, if you are one of our Managed Linux Server Support customers, you don’t have to install Gitea on your Ubuntu 18.04 Server – simply ask our admins, sit back, and relax. Our admins will install and configure Gitea for you immediately.
PS. If you liked this post about how to install Gitea on an Ubuntu 18.04 Server, please share it with your friends on the social networks using the share buttons below, or simply leave a comment in the comments section. Thank you.

How can this be configured such that the repositories are not visible publicly
If you create a repository the default setting is public unless you set the visibility to private.