
In this tutorial, we are going to guide you on how to install Adminer on Ubuntu 22.04.
Adminer, formerly phpMinAdmin is a software tool for managing the content of databases. Adminer is written in PHP and supports various database systems such as MySQL, PostgreSQL, MariaDB, SQLite, Elasticsearch, Oracle, etc. In this blog post, we will install Adminer with the LAMP stack.
Installing Adminer on Ubuntu 22.04 with LAMP stack is a straightforward process that may take up to 15 minutes. Let’s get things going!
Prerequisites
- A server running Ubuntu 22.04
- User privileges: root user or non-root user with sudo privileges
Step 1. Update the System
Every fresh install of the OS needs its system packages to be updated to the latest versions available.
sudo apt-get update -y && sudo apt-get upgrade -y
Step 2. Install Apache Web Server
First, we will install the Apache Web server. Execute the following command to install it:
sudo apt-get install apache2 -y
Once, installed start and enable the service.
sudo systemctl enable apache2 && sudo systemctl start apache2
Check if the service is up and running:
sudo systemctl status apache2
You should receive the following output:
oot@host:~# sudo systemctl status apache2
● apache2.service - The Apache HTTP Server
     Loaded: loaded (/lib/systemd/system/apache2.service; enabled; vendor preset: enabled)
     Active: active (running) since Tue 2023-10-03 16:21:21 CDT; 35s ago
       Docs: https://httpd.apache.org/docs/2.4/
   Main PID: 3128 (apache2)
      Tasks: 6 (limit: 4558)
     Memory: 9.9M
        CPU: 183ms
     CGroup: /system.slice/apache2.service
Step 3. Install PHP 8.1 with Dependencies
Next up will be installing PHP 8.1 with all of the required extensions for running Adminer. To install it all in one go, execute the following command:
sudo apt-get install php8.1 php8.1-cli php8.1-common php8.1-imap php8.1-redis php8.1-snmp php8.1-xml php8.1-zip php8.1-mbstring php8.1-curl php8.1-mysqli libapache2-mod-php php8.1-fpm -y
Step 4. Install MariaDB database server
Lastly, the LAMP stack isn’t complete without a database server. For the database server, we will install MariaDB.
sudo apt install mariadb-server -y
Start and enable the MariaDB service with the following commands:
sudo systemctl start mariadb && sudo systemctl enable mariadb
Check the status of the MariaDB service:
sudo systemctl status mariadb
You should receive the following output:
root@host:~# sudo systemctl status mariadb
● mariadb.service - MariaDB 10.6.12 database server
     Loaded: loaded (/lib/systemd/system/mariadb.service; enabled; vendor preset: enabled)
     Active: active (running) since Tue 2023-10-03 16:23:52 CDT; 22s ago
       Docs: man:mariadbd(8)
             https://mariadb.com/kb/en/library/systemd/
   Main PID: 4455 (mariadbd)
     Status: "Taking your SQL requests now..."
      Tasks: 15 (limit: 4558)
     Memory: 61.3M
        CPU: 1.056s
     CGroup: /system.slice/mariadb.service
             └─4455 /usr/sbin/mariadbd
Step 5. Secure MariaDB database service
MariaDB by default is not safe to use in a production environment. That’s why we will secure the MariaDB database service and set a root password. To do this, execute the following command:
mysql_secure_installation
You need to pass these steps with the following options:
Switch to unix_socket authentication [Y/n] Y

Change the root password? [Y/n] Y
New password:
Re-enter new password:
Password updated successfully!
Reloading privilege tables..
 ... Success!

Remove anonymous users? [Y/n] Y

Disallow root login remotely? [Y/n] Y

Remove test database and access to it? [Y/n] Y

Reload privilege tables now? [Y/n] Y

All done!  If you've completed all of the above steps, your MariaDB
installation should now be secure.

Thanks for using MariaDB
With all of our required software and dependencies installed, let’s start the actual installation.
Step 6. Install Adminer
To install Adminer, execute the following command:
sudo apt install adminer -y
After successful installation, we need to enable PHP-FPM and enable the Adminer Apache configuration with the following commands:
sudo a2enconf php*-fpm

sudo a2enconf adminer
After this, restart the Apache web server.
systemctl reload apache2
Now you can access Adminer at http:YourServerIPAddress/adminer:

Logging in using the root password you set earlier will get you to the following screen:
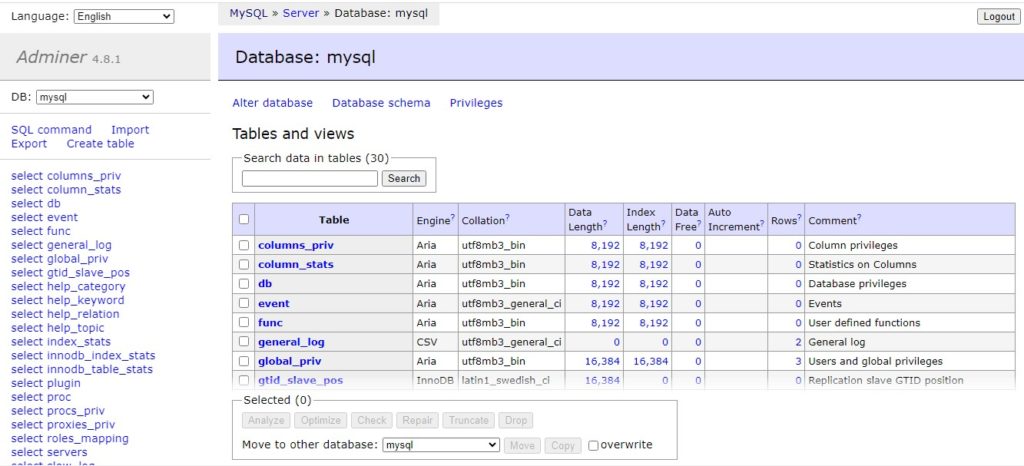
You’re in! You successfully installed Adminer on Ubuntu 22.04 with the LAMP stack.
If you do not want to configure it on your own, you can sign up for one of our Linux server support plans and submit a support ticket. Our admins are available 24/7 and will start work on your request immediately. Always trust our epic support.
If you liked this post on how to install Adminer on Ubuntu 22.04, please share it with your friends on the social networks using the buttons on the left or simply leave a reply below. Thanks.
