
ownCloud is a flexible, self-hosted open source PHP web application used for data synchronization and file sharing. ownCloud allows you to easily manage your files, calendars, contacts, to-do lists, and more, making it a great alternative to the popular Google Drive, Box, Dropbox, iCloud and other cloud platforms. Installing ownCloud on Debian, is fairly easy task and should not take more than 15 minutes. This guide should work on other Debian based systems as well but was tested and written for Debian 9 VPS. Let’s get started with installing ownCloud on your Debian 9 server.
1. Install MySQL Server
ownCloud can use MySQL/MariaDB, PostgreSQL, or SQLite as a backend data storage. In this guide we will use MariaDB as database engine. To install the MariaDB server run the following command:
sudo apt install mariadb-server
When the installation is complete, run the following commands to start and enable the MariaDB service :
sudo systemctl start mariadb
sudo systemctl enable mariadb
To secure your installation and to setup the root password issue:
sudo mysql_secure_installation
2. Create MySQL Database and Usser
To create a database and mysql user for our ownCloud installation run the following commands:
mysql -u root -p
MariaDB [(none)]> CREATE DATABASE owncloud CHARACTER SET utf8;
MariaDB [(none)]> GRANT ALL PRIVILEGES ON owncloud.* TO 'owncloud'@'localhost' IDENTIFIED BY 'owncloud_passwd';
MariaDB [(none)]> FLUSH PRIVILEGES;
MariaDB [(none)]> \q
Install Redis
Redis is an in-memory database which will be used by the ownCLoud installation as memory cache. To install the latest Redis version from the default Debian repositories run the following command:
sudo apt install redis-server
3. Install Apache and PHP
Installing Apache, PHP and PHP modules is pretty straightforward process, just issue the following command:
sudo apt install apache2 mariadb-server libapache2-mod-php7.0 \
    openssl php-imagick php7.0-common php7.0-curl php7.0-gd \
    php7.0-imap php7.0-intl php7.0-json php7.0-ldap php7.0-mbstring \
    php7.0-mcrypt php7.0-mysql php7.0-pgsql php-smbclient php-ssh2 \
    php7.0-sqlite3 php7.0-xml php7.0-zip php-redis php-apcu
When the installation is complete, run the following commands to start and enable the Apache service :
sudo systemctl start apache2
sudo systemctl enable apache2
4. Install ownCloud
The ownCLoud 10 package is not available in default Debian 9 repositories so we will install the package from the official ownCLoud repositories. First add the ownCloud GPG key to the apt sources keyring:
wget -qO- https://download.owncloud.org/download/repositories/stable/Debian_9.0/Release.key | sudo apt-key add -
once the key is added run the following command to enable the ownCLoud repository:
echo 'deb https://download.owncloud.org/download/repositories/stable/Debian_9.0/ /' | sudo tee /etc/apt/sources.list.d/owncloud.list
Before installing the ownCLoud package we need to enable HTTPS transport for the debian apt tool by installing the following package:
sudo apt install apt-transport-https
Update the apt cache list and install the ownCLoud package with the following command:
sudo apt update
sudo apt install owncloud-files
The command above will install the ownCLoud files in the /var/www/owncloud directory.
5. Configure Apache
To configure the Apache web server to serve the ownCLoud directory create a new configuration file with the following content:
sudo nano /etc/apache2/sites-available/owncloud.conf
Alias /owncloud "/var/www/owncloud/"

<Directory /var/www/owncloud/>
Options +FollowSymlinks
AllowOverride All

<IfModule mod_dav.c>
Dav off
</IfModule>

SetEnv HOME /var/www/owncloud
SetEnv HTTP_HOME /var/www/owncloud

</Directory>
Enable the Apache ownCloud configuration:
sudo a2ensite owncloud
and restart the Apache web server:
sudo systemctl restart apache2
Finally set the correct permissions, so the ownCLoud can upload files:
sudo chown -R www-data: /var/www/owncloud/
6. Finish the ownCLoud installation
In the last step of this guide we need to access to ownCLoud Web Interface and finish the installation.
To finish the installation open your browser and navigate to http://your_server_ip_address/owncloud/.
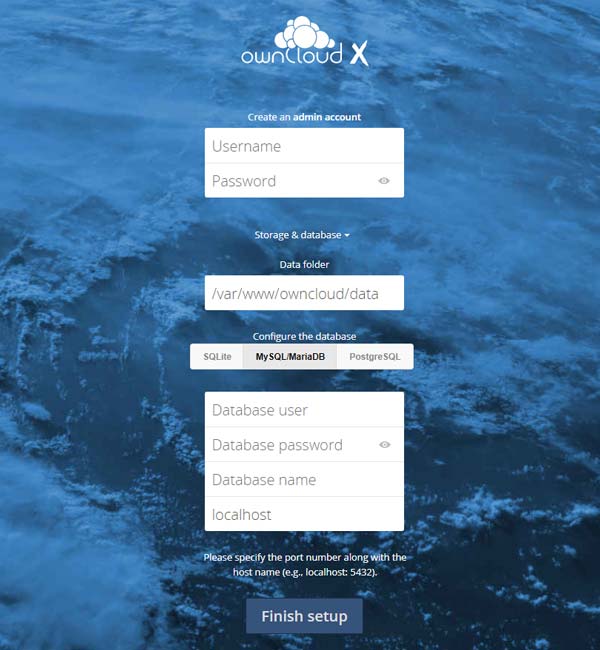
To create your first admin user enter the Username and Password under the “Create an admin account” label, next click on the “Storage & Database” link which will give you an option to select your database backed. Leave the default “Data Folder” value “/var/www/owncloud/data” and under the “Configure the database” label and select “MySQL/MariaDB”. In the database fields enter the database user, the database user password and the database name you previously created. Finally clock on the blue “Finish setup” button and the ownCLoud installer will populate the database and redirect you to the ownCloud login screen.
That’s it. You have successfully installed ownCloud 10 server on your Debian 9 VPS. For more information about how to manage your ownCloud installation, please refer to the official ownCloud User Manual.
Of course you don’t have to Install ownCloud on your Debian 9 server, if you use one of our Linux Support Services, in which case you can simply ask our expert Linux admins to setup this for you. They are available 24×7 and will take care of your request immediately.
PS. If you liked this post, on How To Install ownCloud 10 on Debian 9, please share it with your friends on the social networks using the buttons on the left or simply leave a reply below. Thanks.

Perfect Instructions! Worked fine at first trial, thanks !
how can I Login to my MYSQL? http://your_server_ip_address/mysql/ does not work…
would be happy for e message be Email
thank you
If you want to access and manage your MySQL databases from your browser, you would have to install phpMyAdmin or some other database management tool on your server.
Hello.
I installed everything correctly, but what is the IP of the application?
I installed it on a virtual machine.
Localhost does not work.
IP of application is the IP of the virtual machine.
To find out on debian, you can install net-tools: sudo apt-get install net-tools
Then you can use the command “ifconfig” (as root) to get your ip-adress.
Thanks for the guide, can you explain how to enable https without certificate.
Whatever i try owncloud wont respond to https://server
If you want to use HTTPS, you need to purchase or generate a free SSL certificate for your domain and configure Apache with the new SSL certificate.
For more information, you can check the OwnCloud official documentation.
If you have a problem with this:
sudo apt install apache2 mariadb-server libapache2-mod-php7.0 \
openssl php-imagick php7.0-common php7.0-curl php7.0-gd \
php7.0-imap php7.0-intl php7.0-json php7.0-ldap php7.0-mbstring \
php7.0-mcrypt php7.0-mysql php7.0-pgsql php-smbclient php-ssh2 \
php7.0-sqlite3 php7.0-xml php7.0-zip php-redis php-apcu
You need install the version 7.2 than is the more current version.
When I create Admin with MySQL/MariaDB, I have below message;
Error while trying to create admin user: Failed to connect to the database: An exception occured in driver: SQLSTATE[HY000] [1698] Access denied for user ‘root’@’localhost’
But, with SQLite, I can pass Admin Create task.
How can I use MySQL/MariaDB?
It seems that you are trying to connect to your database server as user root.
When you are configuring the database connection in the “Configure the database” section from your browser, make sure that you enter the exact same database information as you did when creating the database in Step 2 of the tutorial.
I got it.
Thanks for this tutorial
Thanks for this tutorial !
After entering the admin credentials and the MariaDB configuration, the installation ends without error. But on the login screen, when I enter my credentials, nothing happens. Not even an error message. Do you have any idea where my problem is coming from?
you have made an error somewhere during the installation, please try again with the steps we have provided
I get this error
Unable to locate package php7.3-mcrypt
E: Couldn’t find any package by glob ‘php7.3-mcrypt’
E: Couldn’t find any package by regex ‘php7.3-mcrypt’
I am new to Linux but from what I understand Owncloud no longer supports anything below 7.2.
Hi Shawn,
If you have Debian 9 installed, then PHP 7.0 is the default version of PHP distributed with the OS. If you need a newer PHP version you will have to add some unofficial repository.
Hi i keep gettin error when trying to restart apache
root@Gills-Vault:~# sudo systemctl restart apache2
Job for apache2.service failed because the control process exited with error code.
See “systemctl status apache2.service” and “journalctl -xe” for details.
root@Gills-Vault:~# sudo systemctl status apache2
● apache2.service – The Apache HTTP Server
Loaded: loaded (/lib/systemd/system/apache2.service; enabled; vendor preset: enabled)
Active: failed (Result: exit-code) since Sat 2020-06-13 20:15:29 EDT; 18s ago
Docs: https://httpd.apache.org/docs/2.4/
Process: 19391 ExecStart=/usr/sbin/apachectl start (code=exited, status=1/FAILURE)
Jun 13 20:15:29 Gills-Vault systemd[1]: Starting The Apache HTTP Server…
Jun 13 20:15:29 Gills-Vault apachectl[19391]: AH00526: Syntax error on line 15 of /etc/apache2/sites-enabled/owncloud.conf:
Jun 13 20:15:29 Gills-Vault apachectl[19391]: Invalid command ‘~’, perhaps misspelled or defined by a module not included in the server configuration
Jun 13 20:15:29 Gills-Vault apachectl[19391]: Action ‘start’ failed.
Jun 13 20:15:29 Gills-Vault apachectl[19391]: The Apache error log may have more information.
Jun 13 20:15:29 Gills-Vault systemd[1]: apache2.service: Control process exited, code=exited, status=1/FAILURE
Jun 13 20:15:29 Gills-Vault systemd[1]: apache2.service: Failed with result ‘exit-code’.
Jun 13 20:15:29 Gills-Vault systemd[1]: Failed to start The Apache HTTP Server.
root@Gills-Vault:~# sudo nano /etc/apache2/sites-enabled/owncloud.conf
root@Gills-Vault:~# sudo systemctl restart apache2
Job for apache2.service failed because the control process exited with error code.
See “systemctl status apache2.service” and “journalctl -xe” for details.
You should check line 15 of /etc/apache2/sites-enabled/owncloud.conf for typos.