
 This tutorial explains how to install Nagios Core on an Ubuntu 16.04 server. Nagios is an open source enterprise-class software that is used to monitor network infrastructures, servers and applications. With Nagios you can monitor Linux and Windows servers as well as web applications, Linux and Unix applications and Windows applications. The features include parallelized service checks, plugin system, notifications via email, pager or user defined service, web interface for viewing status, log files, problem history and notifications and much more.
This guide should work on other Linux VPS systems as well, such as the latest versions of Ubuntu, but it was tested and written for Ubuntu 16.04.
Step 1. Update your Ubuntu 16.04 server and Install the Necessary Packages
Log in to your VPS via SSH as a sudo user:
ssh userame@IP_Address
Once you are logged in, issue the following commands to update the packages list and upgrade all installed packages:
sudo apt update
sudo apt upgrade
Next, install the install the prerequisite packages necessary for building Nagios and Nagios plugins with the following command:
sudo apt install autoconf gcc libc6 make wget unzip libgd2-xpm-dev
Step 2. Install Apache and PHP 7
To install Apache, PHP 7, and all the necessary modules on your Ubuntu 16.04 server, run the following command:
sudo apt install apache2 php libapache2-mod-php7.0
When the Apache installation is complete, run the following command to enable Apache to start on boot with:
sudo systemctl enable apache2.service
Step 3. Download and Install Nagios
Download the latest stable version of the Nagios tar archive in the /tmp directory on your server by running the following wget command:
wget https://github.com/NagiosEnterprises/nagioscore/releases/download/nagios-4.4.2/nagios-4.4.2.tar.gz -O /tmp/nagioscore.tar.gz
When the download is completed navigate to the /tmp directory extract the archive by issuing following command:
cd /tmp
sudo tar xf nagioscore.tar.gz
Once the Nagios Plugins archive is extracted, change to the nagios-4.4.2 directory:
cd /tmp/nagios-4.4.2
Next step is to run the ./configure script which will check your system for missing libraries and binaries and prepare the Nagios source code for the build process:
sudo ./configure --with-httpd-conf=/etc/apache2/sites-enabled
The output will look like the following:
*** Configuration summary for nagios 4.4.2 2018-08-16 ***:

 General Options:
 -------------------------
        Nagios executable:  nagios
        Nagios user/group:  nagios,nagios
       Command user/group:  nagios,nagios
             Event Broker:  yes
        Install ${prefix}:  /usr/local/nagios
    Install ${includedir}:  /usr/local/nagios/include/nagios
                Lock file:  /run/nagios.lock
   Check result directory:  /usr/local/nagios/var/spool/checkresults
           Init directory:  /lib/systemd/system
  Apache conf.d directory:  /etc/apache2/sites-enabled
             Mail program:  /usr/bin/mail
                  Host OS:  linux-gnu
          IOBroker Method:  epoll

 Web Interface Options:
 ------------------------
                 HTML URL:  http://localhost/nagios/
                  CGI URL:  http://localhost/nagios/cgi-bin/
 Traceroute (used by WAP):  /usr/sbin/traceroute


Review the options above for accuracy.  If they look okay,
type 'make all' to compile the main program and CGIs.
Now that the configuration is completed start the compilation process using the make all command:
make all
Once completed the command will print the following output:
*** Support Notes *******************************************

If you have questions about configuring or running Nagios,
please make sure that you:

     - Look at the sample config files
     - Read the documentation on the Nagios Library at:
          library.nagios.com

before you post a question to one of the mailing lists.
Also make sure to include pertinent information that could
help others help you.  This might include:

     - What version of Nagios you are using
     - What version of the plugins you are using
     - Relevant snippets from your config files
     - Relevant error messages from the Nagios log file

For more information on obtaining support for Nagios, visit:

       support.nagios.com

*************************************************************

Enjoy.
Run the following command to create the Nagios user and group and add Apache to the Nagios group:
sudo make install-groups-users
sudo usermod -a -G nagios www-data
The next step is to install Nagios using the make install command:
sudo make install
Run the following command to install the Nagios sample configuration files:
sudo make install-config
Install the initialization script so that you can manage your Nagios service using the systemctl command :
sudo make install-daemoninit
Next, install the Apache web server configuration files with:
sudo make install-webconf
Restart apache service:
sudo systemctl restart apache2
Run the following command to create a user account called nagiosadmin
sudo htpasswd -c /usr/local/nagios/etc/htpasswd.users nagiosadmin
Next run the following command to install and configure the external command directory:
sudo make install-commandmode
Step 4. Install Nagios Plugins
Install the following dependencies necessary for downloading and compiling Nagios plugins:
sudo apt install autoconf gcc libc6 libmcrypt-dev make libssl-dev wget bc gawk dc build-essential snmp libnet-snmp-perl gettext
Download the latest stable version of the Nagios tar archive in the /tmp directory on your server with:
wget --no-check-certificate -O /tmp/nagios-plugins.tar.gz https://github.com/nagios-plugins/nagios-plugins/archive/release-2.2.1.tar.gz
When the download is completed change to the tmp directory extract the archive with the following commands:
cd /tmp
sudo tar xf nagios-plugins.tar.gz
Once the Nagios Plugins archive is extracted, change to the nagios-plugins-release-2.2.1 directory:
cd /tmp/nagios-plugins-release-2.2.1
The following commands will check your system for missing libraries and binaries and prepare the Nagios Plugins source code for the build process:
./tools/setup
./configure
When the configuration is complete start the compilation process using the make command:
make
Install the Nagios Plugins using the make install command:
sudo make install
Step 5. Access Nagios
Now that you have both Nagios and Nagios Plugins installed on your Ubuntu system, start the Nagios service with the following command:
systemctl start nagios
Check the service status with:
systemctl status nagios
The output will look something like bellow:
● nagios.service - Nagios Core 4.4.2
   Loaded: loaded (/lib/systemd/system/nagios.service; enabled; vendor preset: enabled)
   Active: active (running) since Sat 2018-12-08 09:56:26 CST; 5s ago
     Docs: https://www.nagios.org/documentation
  Process: 16101 ExecStart=/usr/local/nagios/bin/nagios -d /usr/local/nagios/etc/nagios.cfg (code=exited, status=0/SUCCESS)
  Process: 16098 ExecStartPre=/usr/local/nagios/bin/nagios -v /usr/local/nagios/etc/nagios.cfg (code=exited, status=0/SUCCESS)
 Main PID: 16102 (nagios)
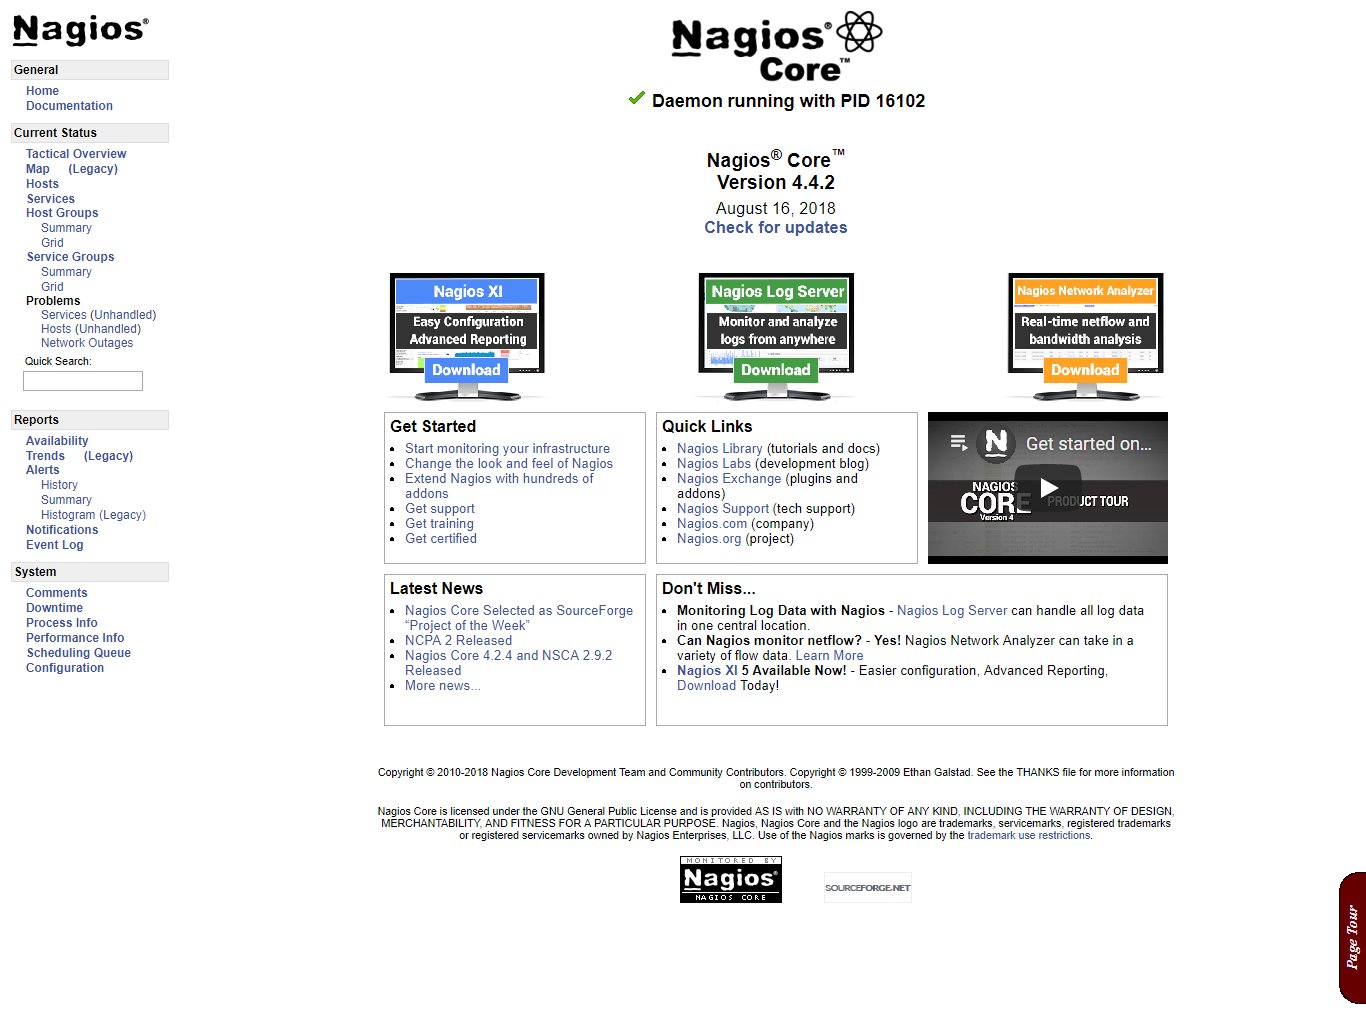
Open your browser and navigate to http://your-domain-or-ip/nagios and you will be presented with the login pop-up.
Enter the login credentials that you created earlier with the htpasswd command and you will be redirected to the Nagios home page as shown on the image below:
That’s it. You have successfully installed Nagios on Ubuntu 16.04. For more information about how to manage your Nagios installation, please refer to the official Nagios documentation.
 Of course, you don’t have to install Nagios on Ubuntu 16.04 if you use one of our Fully-Managed Server Support services, in which case you can simply ask our expert system administrators to install Nagios for you. They are available 24×7 and will take care of your request immediately.
PS. If you liked this post on how to install Nagios on Ubuntu 16.04, or if you found it helpful, please share it with your friends on the social networks using the sharing buttons, or simply leave a comment in the comments section. Thanks.

Hi, I had installed Nagios by following this blog but I didn’t get my localhost running on Nagios core page? Its status is not running state
Just execute:
sudo a2enmod rewrite cgi
systemctl restart apache2