
Nagios (also known as Nagios Core) is a free and open source application which can be used for monitoring Linux or Windows servers, network infrastructures and applications. When properly configured it will alert you when something on your server goes wrong and then notify you again once the problem has been resolved. In this tutorial, we will show you how to install and configure the latest Nagios Core version on a CentOS 7 VPS.
Step 1: Connect to your server
Connect to your server via SSH as user root, use the following command:
ssh root@IP_ADDRESS -p PORT_NUMBER
and replace IP_ADDRESS and PORT_NUMBER with your actual server IP address and SSH port number.
Once logged in, make sure that your server is up-to-date by running the following command:
yum update
Step 2: Install LAMP
For Nagios Core to work on your server you will also need to set up a LAMP or any other web hosting stack. If you already have working web hosting stack installed on your server you can skip this and go to the next step of this tutorial.
To install a LAMP stack with Apache, MariaDB and PHP 7 on your CentOS server, run the following command:
yum install httpd mariadb-server php php-mysql
When the MariaDB installation is complete, you can also run the following command to secure your MariaDB installation:
mysql_secure_installation
You will also need to enable MariaDB and Apache to start on boot with:
systemctl enable httpd.service
systemctl enable mariadb.service
Step 3: Install the required packages
The following packages are also be required by the Nagios Core software. You can install them with the following command:
yum install gcc glibc glibc-common wget gd gd-devel perl postfix
Step 4: Download and Install Nagios Core
Let’s download the latest stable version of the Nagios Core.
First, navigate to the tmp directory on your server with:
cd /tmp
and run the following command to download the tar archive file:
wget -O nagioscore.tar.gz https://github.com/NagiosEnterprises/nagioscore/archive/nagios-4.4.2.tar.gz
Once the download is complete, execute the following command to extract the archive file:
tar xzf nagioscore.tar.gz
Once the archive is extracted, move to the nagioscore-nagios-4.4.2 directory:
cd /tmp/nagioscore-nagios-4.4.2
and run the following command in order to configure the installer and prepare the Nagios Core source code for the compilation process:
./configure
After the configuration is completed, you can now compile Nagios Core by execution the following command:
make all
You also need to run the following commands to create the nagios user and group and add apache to the nagios group:
make install-groups-users
usermod -a -G nagios apache
Now, you can finally run the following command in order to install Nagios Core:
make install
To, install the initialization script which can be used to manage your Nagios service, run the following command:
make install-daemoninit
Next, run the following command to install the Nagios sample configuration files:
make install-config
Run the following command to install and configure the external command file to make Nagios Core to work from the command line:
make install-commandmode
The following command will install the Apache web server configuration files:
make install-webconf
After all the installations are complete, restart your apache service with:
systemctl restart httpd
Step 5: Create nagiosadmin User Account
To be able to log into Nagios, you will need to create an Apache user account.
You need to run the following command to create a new user account called nagiosadmin and assign a password to it:
htpasswd -c /usr/local/nagios/etc/htpasswd.users nagiosadmin
With this step, the main Nagios Core installation is now complete. However, for Nagios Core to operate properly you will also need to install the Nagios Plugins as explained in the next step.
Step 6: Install Nagios Plugins
Before you download and install the Nagios plugins, you need to make sure that the following packages are installed on your CentOS 7 server:
yum install gcc glibc glibc-common make gettext automake autoconf wget openssl-devel net-snmp net-snmp-utils epel-release perl-Net-SNMP
To download and extract the latest version of the Nagios Plugins to the tmp directory on your server, run the following commands:
cd /tmp
wget --no-check-certificate -O nagios-plugins.tar.gz https://github.com/nagios-plugins/nagios-plugins/archive/release-2.2.1.tar.gz
tar zxf nagios-plugins.tar.gz
Once the Nagios Plugins archive is extracted, run the following commands to compile and install the Nagios Plugins on your server:
cd /tmp/nagios-plugins-release-2.2.1/
./tools/setup
./configure
make
make install
Step 7: Accessing Nagios Core
After you have successfully installed Nagios Core and the Nagios Plugins your CentOS 7 system, you can use the following command to start the Nagios service:
systemctl start nagios
To access Nagios Core, open your browser and navigate to http://YOUR-IP-ADDRESS/nagios and log in using the nagiosadmin user account which you have created in one of the previous steps in this tutorial.
After you have successfully logged in, you will be presented with the Nagios Core home screen as shown in the image below:
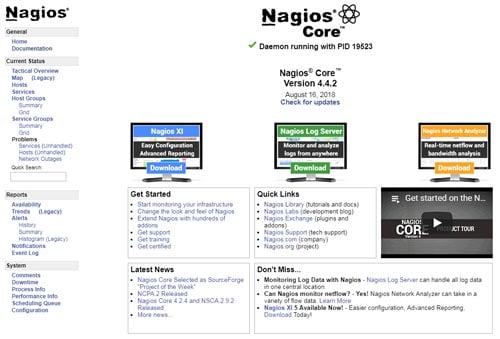
Congratulations! You have successfully installed Nagios Core on CentOS 7. For more information about how to manage your Nagios Core software, please refer to the official Nagios documentation.
Of course, you don’t have to install Nagios Core on CentOS 7, if you use one of our premium server management services, in which case you can simply ask our expert system administrators to install the latest version of Nagios Core on CentOS 7 for you, using the LAMP stack or any other web hosting stack of your choice. They are available 24×7 and will take care of your request immediately.
PS. If you liked this post, on how to install Nagios Core on CentOS 7, please share it with your friends on the social networks using the buttons below or simply leave a comment in the comments section. Thanks.

Hello,
You need to add this in a fresh centos 7 install:
– Before “mysql_secure_installation” run “systemctl start mariadb.service” becouse “mysql_secure_installation” promps a root password and the service is not runnig.
– install unzip before run “make all” -> “yum install unzip”.
Regards!
Before run ./configure install unzip!
After it make all works 🙂
Thanks,
Bye.
If you want to access http://IP/nagios from a remote browser you need to allow port 80 first:
firewall-cmd –add-port=80/tcp
firewall-cmd –runtime-to-permanent
firewall-cmd –reload