
In this guide, we will show you various ways to prevent certain brute force attacks on a WordPress site by blocking offending IP addresses. According to Wordfence report that a number of WordPress attacks have consistently been increasing from different IPs with an average of 4,000 attacks per day as of October 2017. The popularity of WordPress is one of the reasons it’s been on the top list of attacks to CMS (Content Management Systems).
In this article, we will configure a WordPress site to block these attacks. It’s important to note that there are varied ways an attacker can initiate the malicious activity ranging from simple scanning of the website to more advanced exploitation techniques. Our goal is to block IP addresses that are failing login attempts to the site and the ability to manually add IP address to be blocked.
What is an IP address?
In a network, computers or devices communicate and identify themselves by a numerical format like for example 172.31.100.16 which is 4 dotted decimal notation. Each field separated by a period and can be between 0 – 255. IP stands for Internet Protocol which is one of the many protocols the Internet is made of. However, we don’t have to explain in much detail about the IP address but you can check out Wikipedia’s article for more info about IP address – https://en.wikipedia.org/wiki/IP_address. Just remember that each request that hits your website.
IP Address Blocking using a Plugin
There are a lot of WordPress plugins available to choose from that can address our need. In this case, we’ll use Wordfence Security plugin – https://wordpress.org/plugins/wordfence/.
Wordfence is more than just a Firewall but also includes basic malware scanning that helps you find malicious files and the ability to remove them from your site. However, the more in-depth malware scanning is only available in premium version. In this guide, we will use the free version of Wordfence which will be enough to achieve our goal – to block IP addresses.
Installing Wordfence Plugin
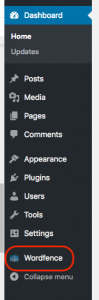
To install the plugin, login into your WordPress admin dashboard and head to Plugins section. On the search bar, search for Wordfence. Once installed, you would be to see Wordfence in one the sidebar menus:
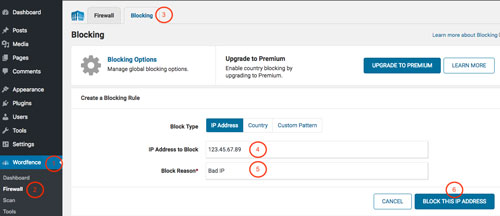
At this point, you can now block specific IPs by going into Wordfence > Firewall > Select Blocking tab, click on IP Address under Block Type, put the IP address and the reason for blocking this IP.
The process described here is to manually block the IP that you have known to block. The Premium version takes this step even further by monitoring in real-time known malicious IP addresses and automatically blocks those IPs without taking action on your part. However, the basic free version is enough in most cases.
Using some sort of security plugin like Wordfence to do the work of protecting the site can most likely introduce performance issues. This especially true if you have several plugins installed alongside Wordfence. Although, this can vary from one site to another and depending on the amount of system resources your server hosting the site. To put it in perspective, it is way better to have at least one security plugin than no security at all.
Block IP using htaccess
Another way of blocking IP address is through .htaccess file. Yes, there is a dot in the first character of the filename. This is because .htaccess file is a hidden file in Linux and Linux assumes all files or directories with a period or dot as the first character as hidden files or directories. WordPress uses this file to manipulate how Apache serves files from its root directory, and subdirectories thereof. The .htaccess file can be used to alter the configuration of the Apache Web Server software to enable/disable additional functionalities.
To start blocking IPs, we will now create an empty .htaccess file. In order for Apache to read this file, the location of this file must be on the path where the web root is located. Typically, using control panel such as cPanel this is located in /home/<cpanel_user>/public_html directory.
You can create a .htaccess file using any text editor such as Notepad, Sublime, TextPad or command line editors like vim or nano. The .htaccess file may already exist either by during installation or generated by a plugin. In most Wordpres sites, the content of .htaccess file may contain basic configuration as shown below:
# BEGIN WordPress
<IfModule mod_rewrite.c>
RewriteEngine On
RewriteBase /
RewriteRule ^index\.php$ - [L]
RewriteCond %{REQUEST_FILENAME} !-f
RewriteCond %{REQUEST_FILENAME} !-d
RewriteRule . /index.php [L]
</IfModule>
# END WordPress
The directives above are to make links posts and pages on WordPres site work. Without the appropriate directives, you may likely encounter page not found error or 404 error.
The syntax or format to block IP in .htaccess file is very straightforward and simple. It does not require you to be an expert programmer to be able to do this. You can add the directive on top of the .htaccess file like the following:
This directive will deny all access, regardless of an IP address including your IP.
deny from all
Or block the specific IP address
deny from 123.45.67.89
You can also block access from all except from certain IP addresses. This can be useful in situations where you want the site to be accessible only to specific IPs.
order allow,deny
allow from 172.16.32.156
allow from 136.47.111.2
deny from all
The above directives tells the Apache Web Server to deny access from all IPs except from 172.16.32.156 and 136.47.111.2. You can add any number of allow or deny lines for each IP. Visitors who’s IP is blocked will see the message:
'403 Forbidden'
You can modify the message above but it is beyond the scope of this article.
That’s it.
You should have an idea by now whether to choose using a plugin or by using .htaccess file to restrict IP addresses on your WordPress site.
Of course you don’t have to do any of this, if you use one of our Linux server management services, in which case you can simply ask our expert Linux admins to do this for you. They are available 24×7 and will take care of your request immediately.
PS. If you liked this post, please share it with your friends on the social networks using the buttons on the left or simply leave a reply below. Thanks.

Great article on blocking IP addresses in WordPress! It’s essential for site security, especially given the rise in brute force attacks. Using plugins like Wordfence provides an easy way to manage blocked IPs without needing technical expertise. The option to edit the .htaccess file adds a robust layer for those comfortable with coding. It’s important to monitor these blocks and adjust as necessary to avoid locking out legitimate users. Overall, a well-rounded guide for anyone looking to enhance their WordPress security.