
OwnCloud is a software used to create a file hosting service. It is a free alternative to Dropbox, Google Drive, and other similar services. OwnCloud can be used to create your file server and configured according to your needs. It offers a range of features, including file sync, team collaboration, calendar, contacts, and more. With ownCloud, we can have complete control over our data, without relying on third-party service providers. OwnCloud is one of the largest open-source projects globally. Additionally, this application has been trusted by thousands of companies and organizations worldwide. In this article, we will show you how to install ownCloud on AlmaLinux 10.
Conventions
# – given commands should be executed with root privileges either directly as a root user or by use of sudo command
$ – given commands should be executed as a regular user
Step 1. Install Dependencies
We need to install some dependencies to proceed with installing ownCloud in our system. Let’s install them by running the command below.
# dnf install tar wget bzip2
Step 2: Install PHP 7.4
At the time of this writing, the default version of PHP on AlmaLinux 10 is PHP 8.3. According to the ownCloud system requirements, we will install PHP 7.4 and use it for the ownCloud installation.
# dnf -y install https://rpms.remirepo.net/enterprise/remi-release-10.rpm
# dnf update
Once updated, we can check all available PHP versions to install on our AlmaLinux server after installing the Remi repo.
# dnf module list php
You will see an output like this:
Last metadata expiration check: 0:00:09 ago on Sun Jun  1 05:25:24 2025.
Remi's Modular repository for Enterprise Linux 10 - x86_64
Name                           Stream                             Profiles                                             Summary
php                            remi-7.4                           common [d], devel, minimal                           PHP scripting language
php                            remi-8.0                           common [d], devel, minimal                           PHP scripting language
php                            remi-8.1                           common [d], devel, minimal                           PHP scripting language
php                            remi-8.2                           common [d], devel, minimal                           PHP scripting language
php                            remi-8.3                           common [d], devel, minimal                           PHP scripting language
php                            remi-8.4                           common [d], devel, minimal                           PHP scripting language

Hint: [d]efault, [e]nabled, [x]disabled, [i]nstalled
As shown above, we should now be able to install PHP 7.4.
To enable the default source to install these scripting packages on our AlmaLinux machine, we need to reset it first, then specify the desired version to enable.
# dnf module reset php
# dnf module enable php:remi-7.4
That’s it, we have switched to PHP 7.4. Now, to install PHP 7.4 with its required extensions, we can execute the command below:
# dnf install php php-{bz2,ctype,curl,fpm,gd,intl,json,fileinfo,libxml,mbstring,mysqlnd,openssl,posix,session,simplexml,xmlreader,xmlwriter,zip,zlib}
You can check and verify the installed PHP version with this command.
# php -v
It will return an output like this:
[root@almalinux10 ~]# php -v
PHP 7.4.33 (cli) (built: Mar 18 2025 06:46:44) ( NTS )
Copyright (c) The PHP Group
Zend Engine v3.4.0, Copyright (c) Zend Technologies
    with Zend OPcache v7.4.33, Copyright (c), by Zend Technologies
If an error occurs during PHP installation, ensure that no PHP is already installed before installing PHP 7.4. You can run this command to remove the existing PHP on your AlmaLinux 10 machine.
# dnf remove php php-common
Now, we can start and enable the PHP FPM service.
# systemctl enable --now php-fpm
The command above will start the PHP-FPM service and enable it, allowing it to run automatically upon server reboot.
Step 3. Install and Configure Nginx
In this step, we will install Nginx as the web server. Let’s proceed with the installation of Nginx now.
# dnf install nginx
To start and enable nginx, run this command.
# systemctl enable --now nginx
Next, let’s create an nginx server block or virtual host.
# nano /etc/nginx/conf.d/owncloud.conf
Insert the following into the file.
upstream owncloud {
    server unix:/run/php-fpm/www.sock;
}

server {
    listen 80;
    server_name yourdomain.com;
    root /var/www/html/yourdomain.com;

    location = /robots.txt {
        allow all;
        log_not_found off;
        access_log off;
    }


    client_max_body_size 512M;
    fastcgi_buffers 64 4K;

    gzip on;
    gzip_vary on;
    gzip_comp_level 4;
    gzip_min_length 256;
    gzip_proxied expired no-cache no-store private no_last_modified no_etag auth;
    gzip_types application/atom+xml application/javascript application/json application/ld+json application/manifest+json application/rss+xml application/vnd.geo+json application/vnd.ms-fontobject application/x-font-ttf application/x-web-app-manifest+json application/xhtml+xml application/xml font/opentype image/bmp image/svg+xml image/x-icon text/cache-manifest text/css text/plain text/vcard text/vnd.rim.location.xloc text/vtt text/x-component text/x-cross-domain-policy;

    location / {
        rewrite ^ /index.php;
    }

    location ~ ^\/(?:build|tests|config|lib|3rdparty|templates|data)\/ {
        deny all;
    }
    location ~ ^\/(?:\.|autotest|occ|issue|indie|db_|console) {
        deny all;
    }

    location ~ ^\/(?:index|remote|public|cron|core\/ajax\/update|status|ocs\/v[12]|updater\/.+|oc[ms]-provider\/.+|.+\/richdocumentscode\/proxy)\.php(?:$|\/) {
        fastcgi_split_path_info ^(.+?\.php)(\/.*|)$;
        set $path_info $fastcgi_path_info;
        try_files $fastcgi_script_name =404;
        include fastcgi_params;
        fastcgi_param SCRIPT_FILENAME $document_root$fastcgi_script_name;
        fastcgi_param PATH_INFO $path_info;
        fastcgi_param modHeadersAvailable true;

        fastcgi_param front_controller_active true;
        fastcgi_pass owncloud;
        fastcgi_intercept_errors on;
        fastcgi_request_buffering off;
    }

    location ~ ^\/(?:updater|oc[ms]-provider)(?:$|\/) {
        try_files $uri/ =404;
        index index.php;
    }

    location ~ \.(?:css|js|woff2?|svg|gif|map)$ {
        try_files $uri /index.php$request_uri;
        add_header Cache-Control "public, max-age=15778463";
        add_header Referrer-Policy "no-referrer" always;
        add_header X-Content-Type-Options "nosniff" always;
        add_header X-Download-Options "noopen" always;
        add_header X-Frame-Options "SAMEORIGIN" always;
        add_header X-Permitted-Cross-Domain-Policies "none" always;
        add_header X-Robots-Tag "none" always;
        add_header X-XSS-Protection "1; mode=block" always;

        access_log off;
    }

    location ~ \.(?:png|html|ttf|ico|jpg|jpeg|bcmap|mp4|webm)$ {
        try_files $uri /index.php$request_uri;

        access_log off;
    }
}
Ensure that you replace ‘yourdomain.com’ with your actual domain or subdomain that is already configured to point to your server. To apply the changes, we need to restart nginx.
# systemctl restart nginx
Step 4. Install MariaDB Server
There are several database engines we can use to install ownCloud. OwnCloud supports MySQL server version 8.0 or higher, or equivalent MariaDB server, PostgreSQL, Oracle, and SQLite (not recommended for production)—AlmaLinux 10 ships with MariaDB 10.11. We can use MariaDB as the database server. Let’s install it from the default repository.
# dnf install mariadb-server
Now, we can enable and start the service.
# systemctl enable --now mariadb
MariaDB should now be up and running.
Step 5. Create a Database
The database server has been installed and is running now. We can log in to MySQL shell and create a database for our ownCloud website.
# mysql
Once logged in to the MySQL shell, we can run the following commands.
mysql> CREATE DATABASE owncloud;
mysql> GRANT ALL on owncloud.* to owncloud@localhost identified by 'm0d1fyth15';
mysql> FLUSH PRIVILEGES;
mysql> \q
At this point, we have created a database called ‘owncloud’ with database user ‘owncloud’ and the password is ‘m0d1fyth15’. Do not forget to replace m0d1fyth15 with a stronger password. We will use this information to install ownCloud.
Step 6. Download and install ownCloud
In this step, we will download the latest stable version of ownCloud. To obtain other versions, you can visit the ownCloud download page.
# cd /var/www/html/yourdomain.com
# wget https://download.owncloud.com/server/stable/owncloud-latest.tar.bz2
# tar -xf owncloud-latest.tar.bz2 --strip-components 1
# chown -R apache: /var/www/html/yourdomain.com
The commands above will download and then extract the compressed file into the directory /var/www/html/yourdomain.com
Step 7. Install ownCloud
The installation should be done in a web browser. We need to go to http://yourdomain.com, make sure to replace yourdomain.com with the domain you configured earlier when setting up the nginx virtual host.
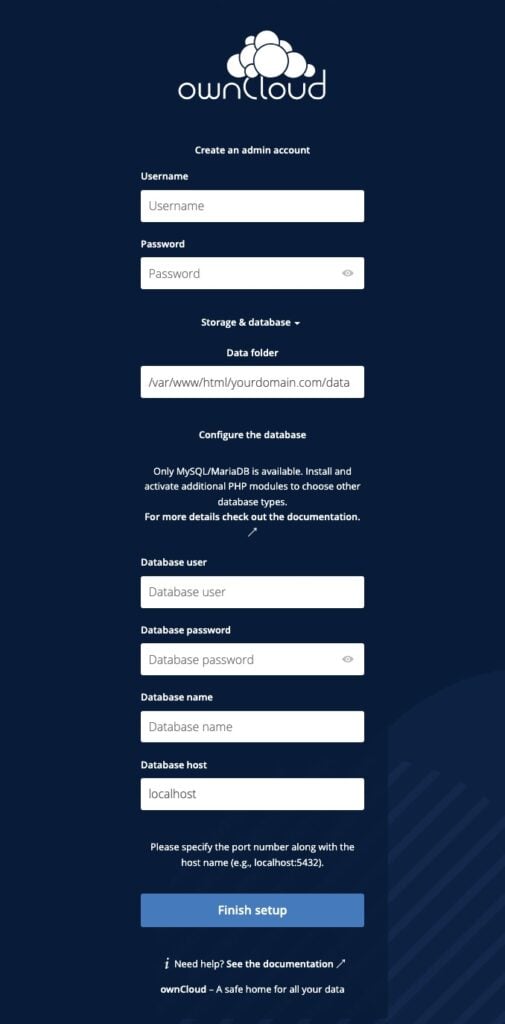
Fill in the forms with the administrative user and password you want to create, and also fill in the database credentials we created earlier in this post. Then, click the Finish Setup button.
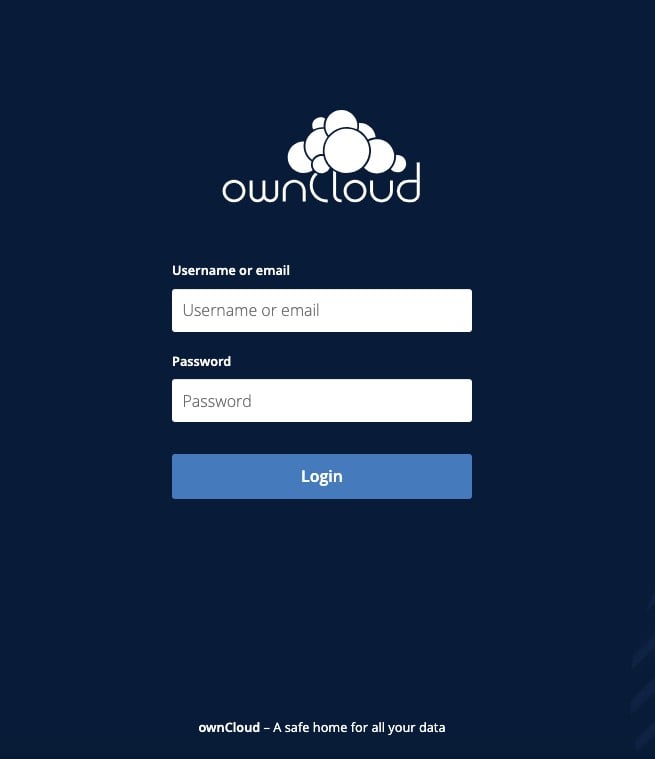
Log in with your administrative account that you created in the previous step. Now, you can customize your freshly installed ownCloud website.
In this tutorial, SELinux is considered disabled. If you encounter an issue, it is most likely related to SELinux.
That’s it! You have successfully installed ownCloud on AlmaLinux 10.
If you use our monthly server management with us, you don’t have to follow this tutorial and install ownCloud on AlmaLinux 9 yourself. Our Linux admins will set up and configure an ownCloud VPS for you. They are available 24/7 and will take care of your request immediately. All you need to do is submit a ticket. Installing ownCloud is not just about the installation; we can help you optimize your ownCloud installation if you have an active service with us. If you don’t use our service, you can sign up for a per-incident server support, and we’ll take care of the installation and optimization for you.
If you liked this post, please share it with your friends or leave a comment below. Thanks.
